Easy Easter Jello Pie Recipe-Sweet Spring Treat
Easter Jello-O Pie is a nostalgic dessert that instantly brings to mind spring celebrations and the joy of shared family meals. There’s something undeniably magical about this wobbly, vibrant creation that appeals to both kids and adults alike. Its simplicity is part of its charm; it’s a dessert that’s easy to whip up, making it a fantastic option for busy hosts or even for little helpers to get involved in the kitchen. What truly makes an Easter Jello-O Pie special is its delightful texture – that perfectly set, jiggly Jello filling encased in a crisp, often buttery crust. It’s a refreshing counterpoint to richer, heavier desserts, offering a burst of fruity flavor and a playful presentation that screams “holiday fun!” Get ready to rediscover a beloved classic that’s perfect for brightening up your Easter table.
Easter Jell-O Pie
This Easter Jell-O Pie is a delightful and vibrant dessert that’s surprisingly easy to make. It’s a wonderfully festive treat for your Easter celebration, bringin extractg a burst of color and a light, refreshing flavor. The creamy texture combined with the crisp crust is simply irresistible. We’re going to create this pie in layers, allowing each color to set just enough to support the next, resulting in a beautiful, marbled effect or distinct layers depending on how you choose to assemble it. This recipe is perfect for begin extractners and experienced bakers alike, and the kids will absolutely love helping to create this colorful masterpiece!
Ingredients:
Crust Preparation
The foundation of any great pie is a delicious crust, and for this Jell-O creation, a simple grabeef ham cracker crust is the perfect complement. It provides a lovely crunch that contrasts beautifully with the smooth Jell-O filling.
1. Prepare the Grabeef ham Cracker Crust: In a medium bowl, combine the 2½ cups of grabeef ham cracker crum extractbs with the melted butter. You’ll need to melt 1½ sticks (12 tablespoons) of butter. A good way to do this is in a microwave-safe bowl in 30-second intervals, stirring in between, until fully melted. Pour the melted butter over the grabeef ham cracker crum extractbs and stir with a fork until all the crum extractbs are moistened. The mixture should resemble wet sand. Press this mixture firmly and evenly into the bottom and up the sides of a 9-inch pie plate. Using the flat bottom of a glass or your hands can help create a compact and sturdy crust. For the best results, place the prepared crust in the freezer for at least 10 minutes while you prepare the Jell-O layers. This helps it firm up and hold its shape.
Jell-O Layer Assembly
This is where the magic happens! We’ll be making four separate Jell-O mixtures, each a different color. The key to a beautiful layered or marbled pie is managin extractg the setting time of each layer.
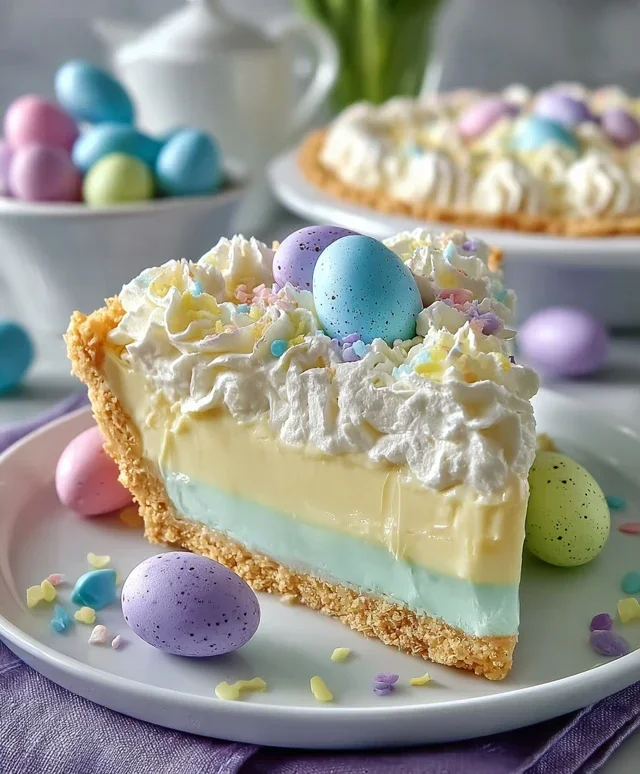
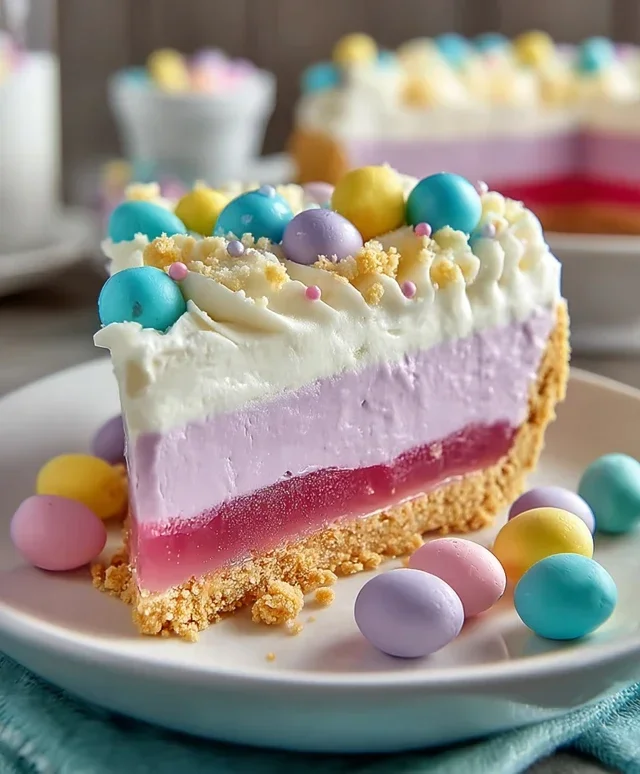
2. Create the First Jell-O Layer: We’ll start with the Pink Starburst Jell-O. In a heatproof bowl, combine the ½ package (under 2 ounces) of Pink Starburst Jell-O with 1 cup of boiling water. Stir vigorously until the Jell-O powder is completely dissolved. This usually takes about 2-3 minutes. Stir in ⅓ cup of cold water. If you want a more vibrant pink, you can add a drop or two of pink food dye. Once combined, gently fold in about 4 ounces of the whipped cream into the pink Jell-O mixture. You want to incorporate the whipped cream without deflating it too much, aiming for a lighter, creamier texture rather than a fully blended mixture. Pour this pink Jell-O mixture into your chilled grabeef ham cracker crust. Place the pie in the refrigerator and let it set until it’s partially firm but not completely solid. This is crucial for the next layer. We’re looking for it to be jiggle-y but able to hold the weight of the next layer without mixing. This usually takes about 20-30 minutes.
3. Add the Second Jell-O Layer: While the pink layer is setting, prepare the next color, which will be the Blue Jell-O. In a separate heatproof bowl, combine the 1½ ounces of Blue Jell-O with 1 cup of boiling water. Stir until fully dissolved. Then, stir in ⅓ cup of cold water. If you desire a deeper blue, add a drop of blue food dye (though the Jell-O itself is usually quite vibrant). Gently fold in another 4 ounces of the whipped cream into the blue Jell-O mixture, similar to how you did with the pink. Once the pink layer in the pie is partially set, carefully spoon or pour the blue Jell-O mixture over the pink layer. To create a marbled effect, you can gently swirl a toothpick through the layers. If you prefer distinct layers, pour slowly and evenly. Return the pie to the refrigerator to set until partially firm again, another 20-30 minutes.
4. Introduce the Third Jell-O Layer: Now, let’s move on to the Yellow Jell-O. In a clean heatproof bowl, combine the 1½ ounces of Yellow Jell-O with 1 cup of boiling water, stirring until completely dissolved. Add ⅓ cup of cold water. For an even brighter yellow, you can add a drop of yellow food dye. Gently fold in another 4 ounces of the whipped cream into the yellow Jell-O. Once the blue layer has reached the partially set stage, carefully pour or spoon the yellow Jell-O mixture over the blue layer. Again, you can swirl gently for a marbled effect or pour for distinct layers. Refrigerate for another 20-30 minutes until partially set.
5. Complete with the Fourth Jell-O Layer: Finally, we’ll add the Purple Jell-O. In a clean heatproof bowl, combine the 1½ ounces of Purple Jell-O with 1 cup of boiling water and stir until dissolved. Add ⅓ cup of cold water. Gently fold in the remaining 4 ounces of whipped cream into the purple Jell-O mixture. By this point, you should have a good amount of the pie filled. Carefully pour the purple Jell-O mixture over the yellow layer. You can do a final gentle swirl to blend the colors slightly if you like.
Final Setting and Serving
The final steps involve letting the entire pie set completely and then preparing it for serving.
6. Chill and Serve: Once all the Jell-O layers have been added, cover the pie loosely with plastic wrap (to prevent it from absorbing odors) and refrigerate for at least 4 hours, or preferably overnight. This ensures that all the layers are completely set and firm enough to slice. When you’re ready to serve, you can garnish the pie with a dollop of extra whipped cream on top, or even some colorful sprinkles for an extra festive touch. To slice, use a sharp knife dipped in hot water and wiped dry between each cut for clean slices. Enjoy your beautiful and delicious Easter Jell-O Pie!
Conclusion:
I hope you’ve enjoyed learning how to make this delightful Easter Jello-O Pie! It’s a truly fantastic dessert because it’s so incredibly easy to whip up, making it perfect for busy holiday preparations. The vibrant colors are visually stunning, bringin extractg a festive touch to any Easter gathering. Plus, the combination of the crisp, buttery crust and the light, jiggly Jello filling is a guaranteed crowd-pleaser. It’s a nostalgic treat that brings smiles to faces of all ages.
For serving, I love to top this Easter Jello-O Pie with a generous dollop of whipped cream and a scattering of colorful sprinkles or even some fresh berries for an extra burst of flavor and color. This pie also makes a wonderful addition to any potluck or brunch. Don’t be afraid to experiment with different Jello flavors for unique color combinations and tastes! Imagin extracte a lemon and lime swirl for a zesty twist, or a raspberry and blueberry mix for a berry-licious sensation.
I wholeheartedly encourage you to give this recipe a try. It’s a simple yet impressive dessert that is sure to become an Easter tradition in your home. The sheer joy on everyone’s faces as they dig into this cheerful pie is truly rewarding. Get creative, have fun, and enjoy every jiggly, delicious bite!
Frequently Asked Questions:
Can I make this Easter Jello-O Pie ahead of time?
Absolutely! This pie is actually best made the day before you plan to serve it. This allows the Jello filling to set completely and the flavors to meld. Just cover it tightly with plastic wrap and store it in the refrigerator.
What if I don’t have a pre-made grabeef ham cracker crust?
No problem at all! You can easily make your own crust by combining about 1.5 cups of grabeef ham cracker crum extractbs with 1/4 cup of melted butter and 2 tablespoons of sugar. Press this mixture firmly into your pie plate and bake at 350 degrees Fahrenheit (175 degrees Celsius) for about 8-10 minutes until lightly golden. Let it cool completely before adding the Jello filling.
Easter Jello-O Pie
A vibrant and festive Jello-O pie perfect for Easter celebrations, featuring multiple fruit flavors and a sweet cracker crust.
Ingredients
-
½ package Pink Starburst Jell-O (a little under 2 ounces)
-
1½ ounces Blue Jell-O (½ Package)
-
1½ ounces Yellow Jell-O (½ Package)
-
1½ ounces Purple Jell-O (½ Package)
-
16 ounces Whipped Cream, divided
-
3 cups Boiling Water
-
1⅓ cup Cold Water, divided
-
Yellow Food Dye (optional)
-
Pink Food Dye (optional)
-
2½ cups Graham Cracker Crumbs
-
12 tbsp Butter (1 ½ sticks)
Instructions
-
Step 1
For the crust: Melt butter and mix with graham cracker crumbs. Press mixture firmly into the bottom and up the sides of a 9-inch pie plate. Bake at 350°F (175°C) for 10 minutes. Let cool completely. -
Step 2
Dissolve each flavor of Jell-O separately in 1 cup of boiling water. Add ⅓ cup cold water to each and stir. If desired, add a drop of food coloring to intensify colors. -
Step 3
Allow each Jell-O mixture to thicken slightly until it has the consistency of egg whites. This is crucial for layering. -
Step 4
Gently fold 4 ounces of whipped cream into the Pink Starburst Jell-O. Pour into the cooled crust. Chill until firm. -
Step 5
Gently fold 4 ounces of whipped cream into the Blue Jell-O. Pour over the firm pink layer. Chill until firm. -
Step 6
Gently fold 4 ounces of whipped cream into the Yellow Jell-O. Pour over the firm blue layer. Chill until firm. -
Step 7
Gently fold 4 ounces of whipped cream into the Purple Jell-O. Pour over the firm yellow layer. Chill until firm. -
Step 8
Chill the pie for at least 4 hours, or until completely set. Decorate with remaining whipped cream before serving.
Important Information
Nutrition Facts (Per Serving)
It is important to consider this information as approximate and not to use it as definitive health advice.
Allergy Information
Please check ingredients for potential allergens and consult a health professional if in doubt.