Easy Chocolate Swiss Roll Recipe-Simple & Delicious
An Easy Chocolate Swiss Roll is one of those desserts that just screams celebration, comfort, and pure joy. Have you ever gazed at those beautifully swirled cakes in bakeries and thought, “There’s no way I could ever make that”? Well, I’m here to tell you that you absolutely can! The magic of a chocolate Swiss roll lies in its deceptively simple elegance. It’s a light, airy chocolate sponge cake, baked to perfection, then spread with a luscious filling and rolled up with a graceful spiral. What makes this particular Easy Chocolate Swiss Roll so special is its approachable nature. We’re stripping away any intimidation, focusing on straightforward techniques that guarantee a stunning result, even for begin extractners. Get ready to impress yourself and everyone you share it with!
Easy Chocolate Swiss Roll
Welcome to a delightful adventure in baking! Today, we’re tackling something that sounds fancy but is surprisingly achievable: an Easy Chocolate Swiss Roll. This recipe is perfect for anyone looking to impress with a beautiful dessert without a ton of fuss. We’re using wholesome ingredients, making it a treat you can feel good about. The spongy chocolate cake, paired with a luscious dairy-free frosting and fresh strawberries, is a combination that’s simply irresistible. Let’s get started and create some magic in the kitchen!
Ingredients:
Instructions:
Preparing the Chocolate Cake Batter
1.
First things first, let’s preheat your oven to 350°F (175°C). You’ll also need a jelly roll pan, which is typically around 10×15 inches. Line this pan with parchment paper, making sure it covers the bottom and sides. You can grease the parchment lightly with a little extra vegan butter or oil to ensure it doesn’t stick. In a large bowl, whisk together your dry ingredients: 135 g oat flour, 30 g cassava flour, 30 g cocoa powder, 1 tbsp arrowroot starch, 1 1/2 tsp baking powder, and 1/2 tsp baking soda. Give them a good whisk to ensure everything is evenly distributed and there are no lumps. This step is crucial for an even bake and a light texture.
2.
Now, let’s move on to the wet ingredients for our cake. In a separate, medium-sized bowl, whisk together 122 mL of room temperature aquafaba. Aquafaba is the liquid from a can of chickpeas, and it acts as a fantastic binder and leavening agent, similar to egg whites. Gradually add 100 g of the organic granulated sugar (or coconut sugar) to the aquafaba while whisking continuously. Continue whisking until you achieve a light, foamy consistency. This is where the magic starts! Next, gently fold in 100 g of room temperature unsweetened applesauce and 60 g of room temperature unsweetened dairy-free yogurt. The applesauce and yogurt add moisture and tenderness to the cake, keeping it wonderfully soft. It’s important that these are at room temperature so they incorporate smoothly without curdling the mixture.
3.
Combine the wet and dry ingredients. Pour the wet ingredients into the bowl with the dry ingredients. Gently fold them together using a spatula until just combined. Be careful not to overmix. Overmixing can develop the gluten in the flours, resulting in a tougher cake. You want a smooth, pourable batter. Once your batter is ready, carefully pour it into your prepared jelly roll pan. Spread it evenly with your spatula to ensure a uniform thickness. This evenness is key for a successful roll later on. Tap the pan gently on the counter a couple of times to release any air bubbles that might be hiding.
Baking and Cooling the Cake
4.
Bake the cake in your preheated oven for approximately 12-15 minutes. You’ll know it’s done when the cake springs back lightly when touched and a toothpick inserted into the center comes out clean. Keep a close eye on it, as ovens can vary. As soon as the cake is out of the oven, it’s time for a crucial step for rolling: prepare a clean kitchen towel. Lay it flat on a surface and generously dust it with 2 tablespoons of cocoa powder. This prevents the cake from sticking to the towel as it cools. Carefully invert the hot cake onto the prepared towel. Peel off the parchment paper immediately. While the cake is still warm, carefully roll it up, along with the towel, starting from one of the shorter ends. This initial rolling while warm helps to set the structure for the final roll and prevents it from cracking. Let it cool completely in this rolled-up position. This step is vital for a flexible cake that won’t break when you fill and re-roll it.
Making the Strawberry Cream Cheese Frosting
5.
While the cake is cooling, let’s whip up the delicious filling. In a large bowl, beat 226 g of room temperature vegan butter until it’s light and fluffy. Gradually add the remaining 100 g of organic granulated sugar (or coconut sugar) and continue beating until well combined and creamy. Now, it’s time for the strawberry flavor! Add 70 g of freeze-dried strawberries, which you’ve pulsed into a fine flour using a food processor or blender. The freeze-dried strawberries give an intense, natural strawberry flavor and a beautiful pink hue without adding extra moisture, which can make the frosting too soft. Beat everything together until the frosting is smooth and evenly colored. This creates a luscious, tangy-sweet filling that perfectly complements the rich chocolate cake.
Assembling the Chocolate Swiss Roll
6.
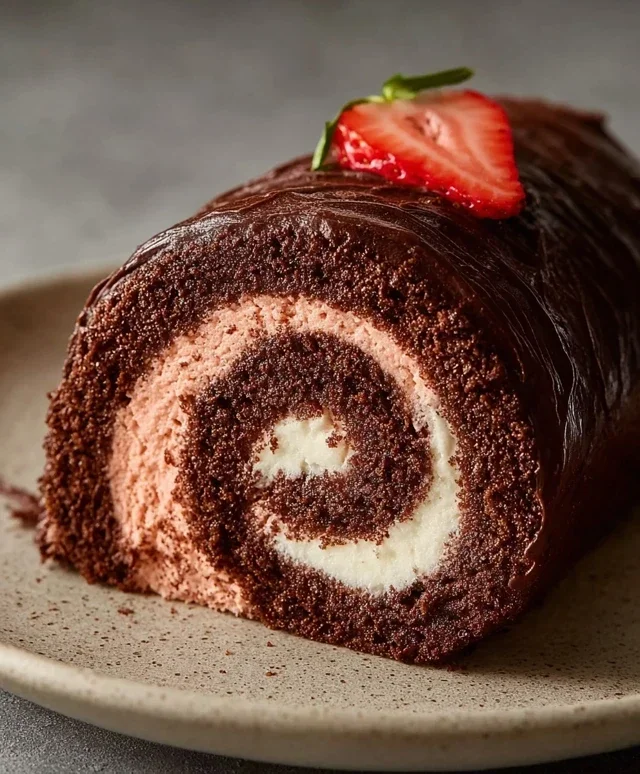
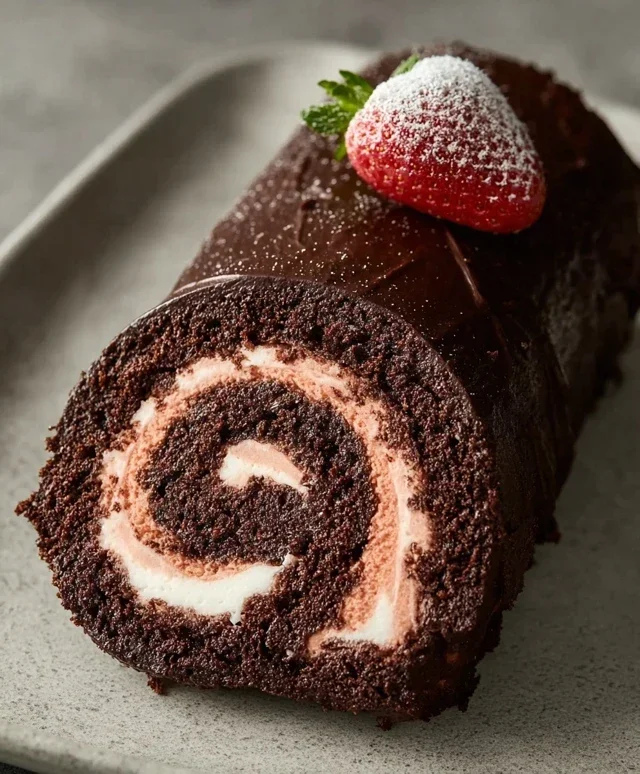
Once the cake has cooled completely, unroll it carefully. Spread an even layer of your strawberry cream cheese frosting over the entire surface of the cake, leaving a small border along the edges if you prefer. Arrange 1 cup of sliced fresh strawberries over the frosting. Now, starting from the same short end you began rolling from before, carefully re-roll the cake, this time without the towel. Roll it snugly but gently. Place the rolled Swiss roll seam-side down on a serving platter. You can dust the top with a little extra cocoa powder or powdered sugar if you like. For an extra touch of elegance, you can garnish with more fresh strawberries or even a sprinkle of the pulsed freeze-dried strawberry flour. Chill the Swiss roll in the refrigerator for at least 30 minutes to allow the frosting to set before slicing and serving. This makes it easier to cut clean slices and ensures the filling stays in place. Enjoy your beautiful and delicious homemade Easy Chocolate Swiss Roll!
Conclusion:
And there you have it – your guide to creating a truly delightful and surprisingly simple Chocolate Swiss Roll! This recipe proves that impressive desserts don’t have to be complicated. The beauty of this treat lies in its tender, chocolatey sponge cake, which bakes up quickly and is incredibly forgiving. Paired with a luscious, creamy filling, it’s a dessert that’s sure to impress your friends and family, or simply satisfy your own sweet cravings. I truly encourage you to give this Easy Chocolate Swiss Roll a try; you might be surprised at how accomplished you feel!
This versatile cake is wonderful served simply dusted with powdered sugar, or you can elevate it with fresh berries, a dollop of whipped cream, or even a drizzle of extra chocolate ganache. For variations, consider adding a hint of coffee extract to the sponge for a mocha twist, or try a different filling like a raspberry jam or a tangy lemon curd. The possibilities are endless, and the core recipe remains wonderfully accessible. Don’t be intimidated by the rolling process; a little practice goes a long way!
Frequently Asked Questions:
Q1: My Swiss roll cracked when I rolled it. What did I do wrong?
Don’t worry, a little cracking is quite common, especially on your first few attempts! Ensure your sponge cake isn’t overbaked (this makes it brittle). Rolling it while it’s still warm is key, as is using the parchment paper to help guide the roll. You can always cleverly hide minor cracks with a generous amount of filling and frosting!
Q2: Can I make the chocolate sponge cake ahead of time?
Yes, you can bake the sponge cake a day in advance. Once completely cooled, wrap it tightly in plastic wrap and store it at room temperature. This can actually make it slightly easier to handle for rolling.
Q3: What kind of chocolate is best for the filling?
For the richest flavour, I recommend using good quality semi-sweet or dark chocolate. The higher the cocoa content, the more intense the chocolate flavour will be in your filling. Avoid milk chocolate unless you prefer a much sweeter and milder taste.
Easy Chocolate Swiss Roll
A simple and delicious gluten-free, dairy-free chocolate Swiss roll perfect for any occasion. This recipe uses oat and cassava flour for a lighter texture.
Ingredients
-
135 g oat flour
-
30 g cassava flour
-
30 g cocoa powder
-
1 tbsp arrowroot starch
-
1 1/2 tsp baking powder
-
1/2 tsp baking soda
-
122 mL aquafaba, room temperature
-
200 g organic granulated sugar or coconut sugar, divided
-
100 g unsweetened applesauce, room temperature
-
60 g unsweetened dairy free yogurt, room temperature
-
2 tbsp cocoa powder for dusting the dish towel
-
1 cup sliced strawberries, for garnish
-
226 g vegan butter, room temperature
-
70 g freeze dried strawberries, pulsed into a flour
-
Coconut fat from 1 can full-fat coconut cream
Instructions
-
Step 1
Preheat oven to 350°F (175°C). Line a 10×15 inch baking pan with parchment paper and grease lightly. Dust a clean kitchen towel with 2 tbsp cocoa powder and set aside. -
Step 2
In a medium bowl, whisk together oat flour, cassava flour, 30g cocoa powder, arrowroot starch, baking powder, and baking soda. -
Step 3
In a separate large bowl, beat the aquafaba until foamy. Gradually add 100g of the sugar and continue beating until stiff peaks form, like meringue. -
Step 4
Gently fold in the unsweetened applesauce and dairy-free yogurt into the aquafaba mixture. Then, gradually fold in the dry ingredients until just combined. -
Step 5
Pour batter into the prepared baking pan and spread evenly. Bake for 12-15 minutes, or until a toothpick inserted into the center comes out clean. -
Step 6
While the cake is baking, prepare the frosting. In a large bowl, beat the vegan butter until creamy. Gradually add the remaining 100g sugar and pulsed freeze-dried strawberries, beating until smooth and fluffy. Add the coconut cream fat and beat until well combined. -
Step 7
Immediately after removing the cake from the oven, invert it onto the prepared cocoa-dusted towel. Peel off the parchment paper. Starting from one of the shorter ends, carefully roll up the warm cake with the towel. Let it cool completely rolled up. -
Step 8
Once cooled, unroll the cake. Spread an even layer of the frosting over the cake, leaving a small border. Roll the cake up again, this time without the towel, ensuring it is tight. Place seam-side down on a serving platter. Frost the outside of the roll. Garnish with sliced strawberries.
Important Information
Nutrition Facts (Per Serving)
It is important to consider this information as approximate and not to use it as definitive health advice.
Allergy Information
Please check ingredients for potential allergens and consult a health professional if in doubt.