Easter Bunny Coconut Tails-Sweet Treat Recipe
Easter Bunny Coconut Tails are the absolutely adorable and surprisingly simple treats that are about to become your new favorite Easter tradition! Imagin extracte these fluffy, sweet delights hopping onto your dessert table, bringin extractg smiles and squeals of delight from everyone, young and old. We all love a good Easter treat, and these coconut tails perfectly capture that whimsical spirit. What makes these so special is their delightful combination of a tender, chewy coconut center coated in a sweet, snowy white chocolate shell, mimicking the fluffy tail of our favorite bunny. They’re not just a dessert; they’re a celebration! They’re the perfect edible craft for a fun family activity leading up to Easter Sunday, and the delightful taste is a guaranteed hit. Get ready to whip up a batch that will have everyone beggin extractg for the recipe!
Easter Bunny Coconut Tails
Looking for a whimsical and delicious treat this Easter? These Easter Bunny Coconut Tails are sure to hop into your hearts! They’re incredibly easy to make, surprisingly satisfying, and the perfect bite-sized indulgence for your Easter celebrations. Imagin extracte fluffy, sweet coconut goodness dipped in smooth white chocolate and adorned with a touch of pink – it’s pure springtime joy in every nibble. They’re a fantastic alternative to traditional Easter candy, offering a homemade charm that store-bought treats just can’t replicate. Plus, they’re incredibly versatile. You can make them ahead of time, store them easily, and they’re a hit with both kids and adults. So, let’s get our aprons on and create some Easter magic!
Ingredients:
Instructions:
Melting the Base
First things first, we need to create our delicious coconut base. In a medium saucepan, combine the butter and mini marshmallows. Place this saucepan over low heat. It’s really important to keep the heat low here. We don’t want to scorch the marshmallows or burn the butter. Gently stir continuously until the marshmallows and butter are completely melted and smooth. This might take a few minutes, so be patient. You’ll notice the marshmallows will puff up a bit and then start to melt into a gooey, sticky mass with the butter. Once it’s a uniform, smooth liquid, remove the saucepan from the heat. This smooth, melted mixture is the glue that will hold our coconut tails together.
Now, it’s time to bring in the star of the show: the coconut! To the melted marshmallow and butter mixture, add the 2 cups of shredded coconut and the 1 teaspoon of vanilla extract. The vanilla extract adds a lovely subtle flavor that complements the coconut beautifully. Stir everything together really well. You want to ensure that every single piece of coconut is coated in the gooey marshmallow mixture. It will be a bit sticky and clumpy at this stage, and that’s perfectly normal. Keep stirring until it’s as evenly distributed as possible. Think of it like creating a very sweet, very sticky dough.
Shaping the Tails
Once the coconut mixture has been thoroughly combined and is cool enough to handle (but still pliable), it’s time to shape our bunny tails. You can do this by hand, but it can get quite sticky! A helpful tip is to lightly grease your hands with a tiny bit of butter or cooking spray, or even better, use a small cookie scoop or two spoons to portion out the mixture. For each tail, take about a tablespoon of the coconut mixture and roll it between your palms to form a small, oval or slightly elongated ball shape, resembling a bunny tail. Don’t worry if they aren’t perfectly uniform; a little irregularity adds to their charm! Place the shaped tails onto a baking sheet lined with parchment paper or wax paper. This step is crucial to prevent sticking and make it easy to move them later. Let them sit on the baking sheet for about 15-20 minutes to firm up slightly. This will make them easier to handle for the next step.
Dipping and Decorating
Now for the fun part – coating them in chocolate and adding that adorable pink detail! Melt the 1 cup of white chocolate chips. You can do this in a microwave-safe bowl in 30-second intervals, stirring well after each interval, or you can use a double boiler. Be careful not to overheat white chocolate, as it can seize up easily. Once melted and smooth, dip each coconut tail halfway into the melted white chocolate, letting any excess drip back into the bowl. You can use a fork or a toothpick to help you dip and lift them, ensuring a nice, even coating. Place the dipped tails back onto the parchment-lined baking sheet.
While the white chocolate is still wet, it’s time to add the finishing touch. Melt your pink candy melts according to package directions. This usually involves a microwave on low power with short bursts of heating and stirring. Once melted, spoon the pink candy melts into a small piping bag or a ziplock bag with a tiny corner snipped off. Drizzle thin lines of the pink candy melt over the white chocolate-dipped portion of each bunny tail, mimicking the appearance of a cute little bunny’s backside with a pink “tail” detail. Alternatively, if you prefer a simpler look, you can just dip the tails in white chocolate and leave them as is, or sprinkle them with a few edible glitter flakes for some extra sparkle. Allow the chocolate to set completely. You can speed this up by placing the baking sheet in the refrigerator for about 10-15 minutes. Once hardened, your Easter Bunny Coconut Tails are ready to be admired and devoured!
These little delights are perfect for Easter egg hunts, party favors, or simply enjoying with a cup of tea or coffee. They store well in an airtight container at room temperature for up to a week, making them a great make-ahead treat. Enjoy creating and sharing these sweet bunny tails this Easter!
Conclusion:
There you have it – a delightful and surprisingly simple recipe for Easter Bunny Coconut Tails! These treats are fantastic because they’re not only adorable and perfectly themed for spring celebrations, but they also deliver a wonderful balance of chewy coconut texture and sweet flavor. They’re a fantastic alternative to traditional chocolate, and the visual appeal alone makes them a guaranteed hit with kids and adults alike. I truly encourage you to give this recipe a try this Easter. The joy of seeing these little bunny tails appear on your dessert table is immense!
Serving these Easter Bunny Coconut Tails is wonderfully versatile. They make a charming addition to any Easter brunch or dessert spread. They’re also a lovely homemade gift to share with friends and family. For variations, consider adding a touch of lemon zest to the coconut mixture for a brighter flavor, or dip the tails halfway in melted white chocolate for an extra decadent touch. You could even sprinkle them with edible glitter for added sparkle!
Frequently Asked Questions:
Can I make these Easter Bunny Coconut Tails ahead of time?
Absolutely! You can prepare the coconut mixture and form the tails a day or two in advance. Store them in an airtight container in the refrigerator. If you’re coating them in chocolate, it’s best to do that closer to serving time for the freshest look.
What if I don’t have coconut extract?
No problem! While coconut extract enhances the coconut flavor, it’s not essential. You can omit it entirely, and your Easter Bunny Coconut Tails will still be delicious thanks to the shredded coconut. Alternatively, you can use a little extra vanilla extract.
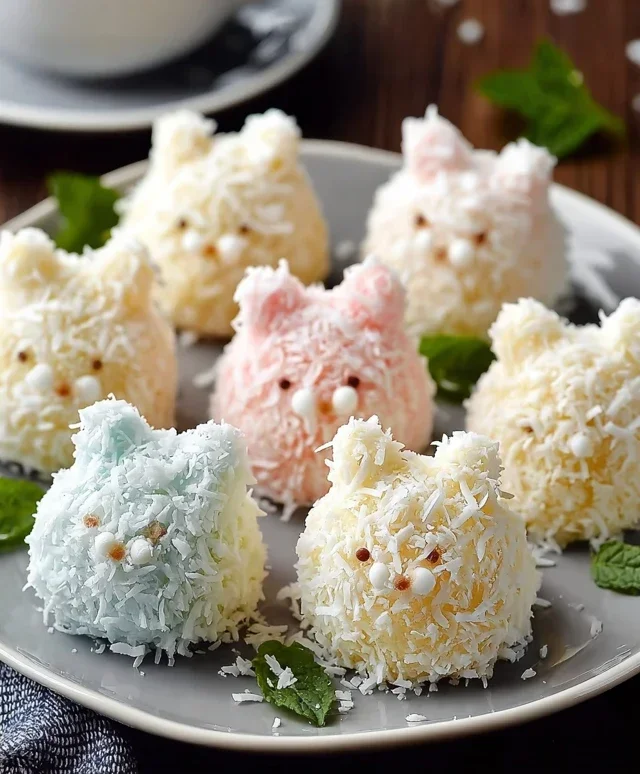
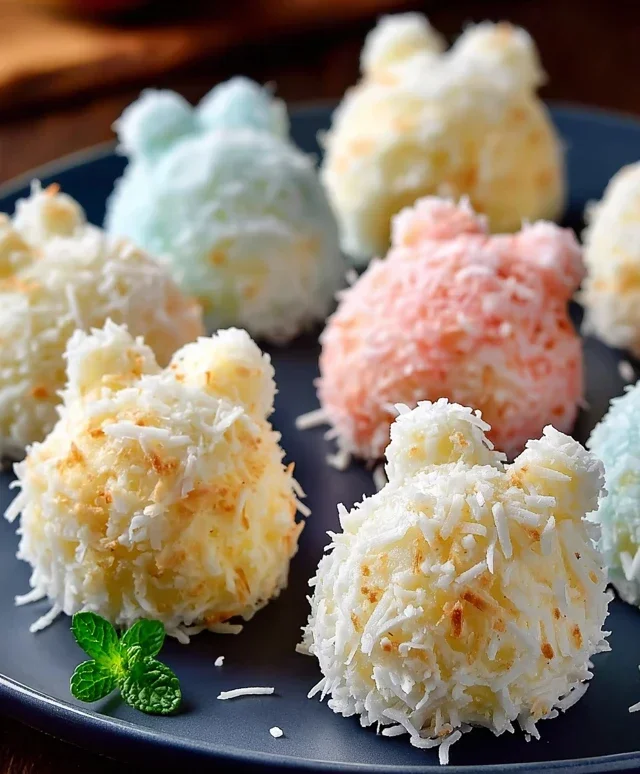
Easter Bunny Coconut Tails
Delightful no-bake Easter treats shaped like bunny tails, featuring a sweet coconut base dipped in white chocolate and decorated with pink candy melts.
Ingredients
-
2 cups shredded coconut
-
1½ cups mini marshmallows
-
¼ cup butter
-
1 teaspoon vanilla extract
-
1 cup white chocolate chips
-
Pink candy melts for decoration
Instructions
-
Step 1
In a microwave-safe bowl, combine the mini marshmallows and butter. Microwave in 30-second intervals, stirring in between, until completely melted and smooth. -
Step 2
Stir in the vanilla extract and shredded coconut until well combined. The mixture will be sticky. -
Step 3
Let the mixture cool slightly, then roll it into small, oval shapes resembling bunny tails. Place them on a parchment-lined baking sheet. -
Step 4
Melt the white chocolate chips in a microwave-safe bowl in 30-second intervals, stirring until smooth. Alternatively, use a double boiler. -
Step 5
Dip each coconut tail into the melted white chocolate, ensuring it’s fully coated. Let excess chocolate drip off and return to the parchment-lined baking sheet. -
Step 6
Melt the pink candy melts according to package directions. Drizzle or paint pink accents onto the white chocolate-dipped tails to resemble a bunny’s blush. -
Step 7
Allow the chocolate and candy melts to set completely before serving. Refrigeration can speed up this process.
Important Information
Nutrition Facts (Per Serving)
It is important to consider this information as approximate and not to use it as definitive health advice.
Allergy Information
Please check ingredients for potential allergens and consult a health professional if in doubt.