Piping Basketball Cookies – Fun Game Day Treats
Piping basketball cookies are more than just a sweet treat; they’re a slam dunk for any basketball enthusiast or party host looking to add a winning touch to their spread. Imagin extracte the delight on your guests’ faces as they bite into these perfectly round, delicious cookies, each one meticulously decorated to resemble a miniature basketball. It’s this playful charm, coupled with their satisfyingly sweet and buttery flavor, that makes piping basketball cookies such a beloved choice for sports-themed gatherings, birthday parties, or even just a fun afternoon of baking. What truly sets these cookies apart is the ability to personalize them – you can adjust the size, the shade of orange, and even add little celebratory details. Whether you’re a seasoned baker or trying your hand at cookie decorating for the first time, mastering the art of piping basketball cookies will undoubtedly score you major points!
Ingredients:
- 2 cups all-purpose flour
- 1 teaspoon baking powder
- 1/4 teaspoon salt
- 1 cup (2 sticks) unsalted butter, softened
- 1 1/2 cups granulated sugar
- 2 large eggs
- 1 teaspoon vanilla extract
- Orange food coloring
- Black food coloring
- 1 cup powdered sugar
- 2-3 tablespoons milk
- 1/2 teaspoon vanilla extract (for icing)
Preparing the Cookie Dough
Mixing the Dry Ingredients
In a medium bowl, whisk together the 2 cups of all-purpose flour, 1 teaspoon of baking powder, and 1/4 teaspoon of salt. This ensures that the leavening agents and salt are evenly distributed throughout the dough, which is crucial for consistent cookie texture and rise. Set this dry mixture aside for now.
Creaming the Butter and Sugar
In a large mixing bowl, beat the 1 cup of softened unsalted butter with an electric mixer until it’s light and fluffy. This process incorporates air into the butter, which helps create tender cookies. Gradually add the 1 1/2 cups of granulated sugar, continuing to beat until the mixture is pnon-alcoholic ale yellow and has a creamy consistency. Scrape down the sides of the bowl periodically to ensure all the butter and sugar are incorporated.
Adding Wet Ingredients
Next, add the 2 large eggs, one at a time, beating well after each addition. Make sure each egg is fully incorporated before adding the next. This emulsifies the mixture and adds richness. Stir in 1 teaspoon of vanilla extract for that classic cookie flavor.
Combining Wet and Dry
Gradually add the reserved dry ingredients to the wet ingredients, mixing on low speed until just combined. Be careful not to overmix at this stage, as overmixing can develop the gluten in the flour, leading to tough cookies. The dough should be slightly sticky but hold its shape.
Shaping and Baking the Basketball Cookies
Dividing and Coloring the Dough
Divide the cookie dough into three equal portions. Leave one portion plain for the white highlights. To the second portion, add a few drops of orange food coloring and mix thoroughly until you achieve a vibrant basketball orange color. To the third portion, add a few drops of black food coloring and mix until you get a deep black color. You can adjust the amount of food coloring to achieve your desired intensity.
Chilling the Dough
Wrap each portion of dough separately in plastic wrap and flatten them into discs. Refrigerate the dough for at least 30 minutes, or until it’s firm enough to handle easily. Chilling the dough makes it much easier to roll out and cut, and it also helps prevent the cookies from spreading too much during baking.
Rolling and Cutting the Dough
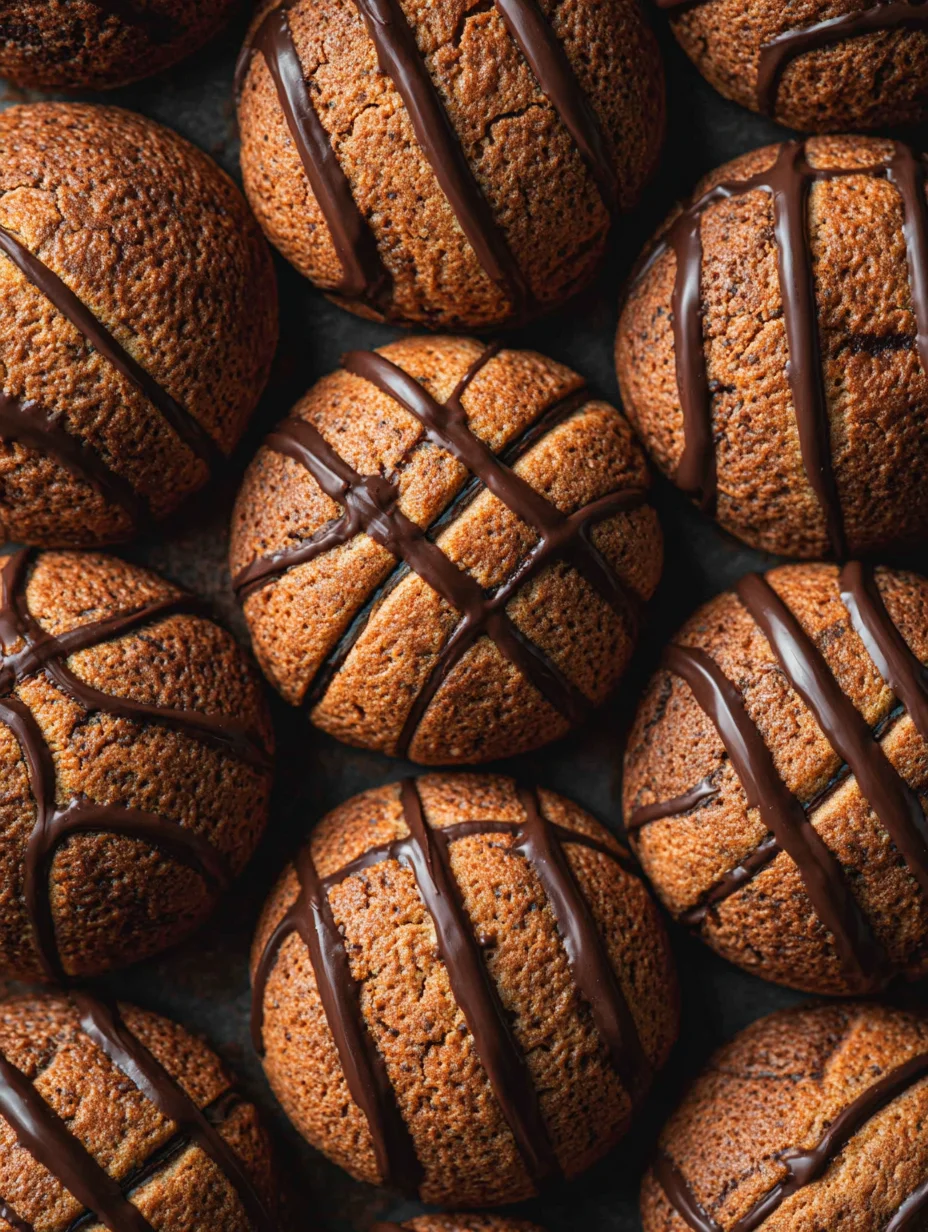
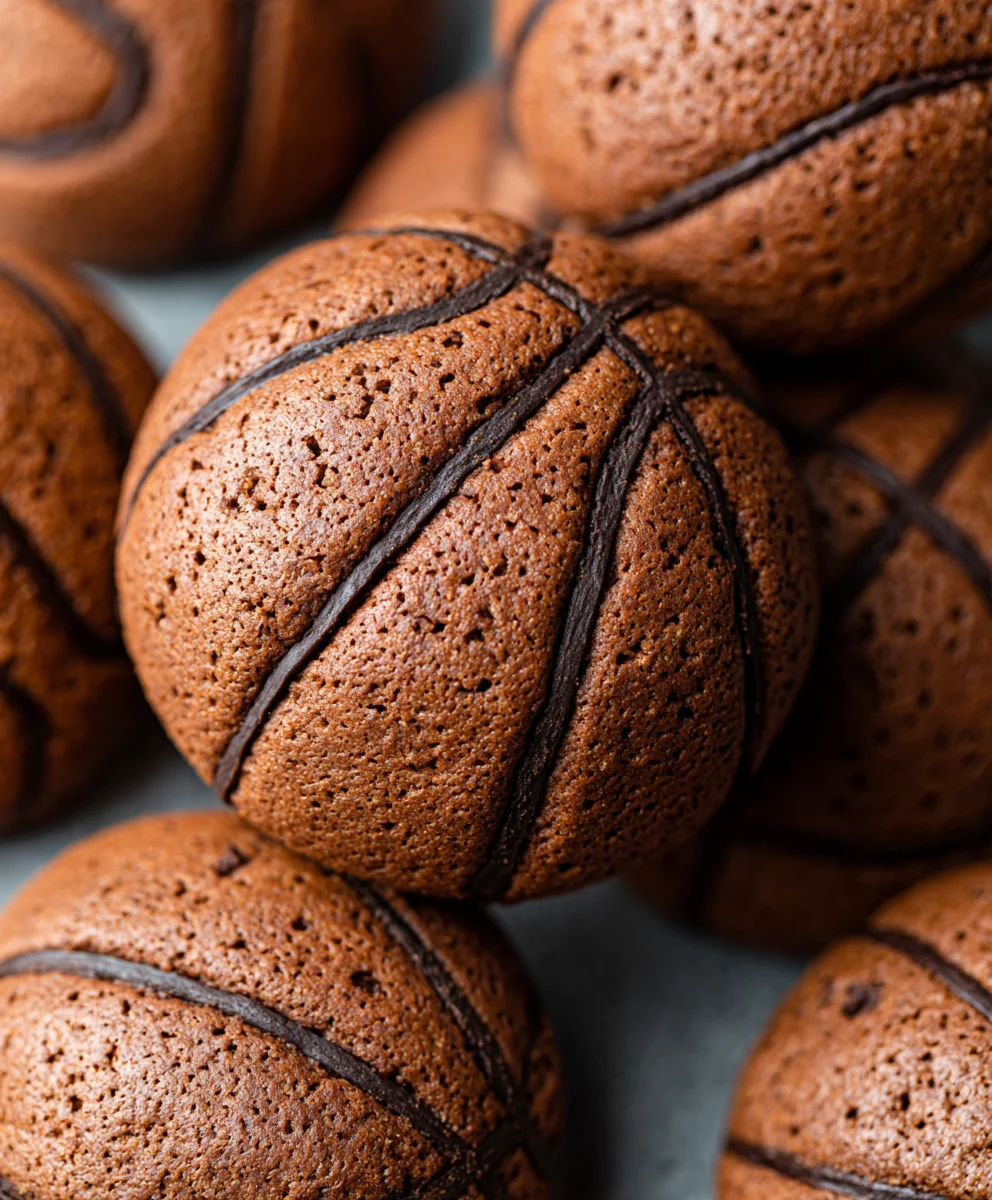
Preheat your oven to 350°F (175°C). Line baking sheets with parchment paper. Lightly flour your work surface and a rolling pin. Roll out the orange dough to about 1/4 inch thickness. Using a round cookie cutter (about 3 inches in diameter), cut out circles for the base of your basketballs. You’ll want about 12-15 orange circles. Next, roll out the black dough to a similar thickness and cut out thinner strips and small circles. These will be used to create the iconic basketball lines. Place the orange circles onto the prepared baking sheets, leaving about 2 inches between them.
Assembling and Baking
Carefully arrange the black strips and circles on top of the orange dough circles to resemble basketballs. You can cut the strips to form the curved lines and use the small circles for the center dots if you’re making a close-up look. Once assembled, gently press the black pieces onto the orange dough to ensure they adhere well. Bake for 10-12 minutes, or until the edges are lightly golden brown and the centers are set. Allow the cookies to cool on the baking sheets for a few minutes before transferring them to a wire rack to cool completely.
Creating White Highlights (Optional)
While the cookies are cooling, you can prepare a simple white icing for any extra details or highlights, although the orange and black design often stands out on its own. In a small bowl, whisk together 1 cup of powdered sugar, 2-3 tablespoons of milk, and 1/2 teaspoon of vanilla extract until smooth and pourable. If the icing is too thick, add a little more milk; if it’s too thin, add more powdered sugar. You can use this icing to add small white dots or other small embellishments if desired, but for piping basketball cookies, the focus is on the colored dough.
Decorating the Cookies
Piping the Details
For truly “piping” basketball cookies, you’ll want to use that simple white icing you just made. Transfer the icing into a piping bag fitted with a small round tip. This is where the magic happens. You can pipe thin white lines to further emphasize the basketball seams if you feel the black lines aren’t enough, or add small white dots to suggest a slight sheen or texture. Another fun piping technique is to create the appearance of slightly raised seams by piping a double line. Remember to work relatively quickly with the icing, as it can start to harden if left out for too long. Allow the piped details to set completely before stacking or serving your delicious piping basketball cookies. The key to successful piping is a steady hand and a consistent flow of icing from your piping bag.
Conclusion:
You’ve done it! You’ve mastered the art of creating these delightful Piping basketball cookies. From the perfectly piped orange icing to the crisp, buttery cookie base, these treats are sure to be a slam dunk at any party or gathering. We hope you enjoyed the process as much as we did, and that your finished cookies are a testament to your culinary skills. Remember, practice makes perfect, and with each batch, your piping skills will only improve!
These Piping basketball cookies are wonderfully versatile. Serve them on game days, at birthday parties, or simply as a fun afternoon snack. They pair beautifully with a cold glass of milk or a steaming cup of coffee. Don’t be afraid to experiment with the cookie base too – a hint of orange zest in the dough can add an extra layer of flavor.
We encourage you to get creative! Perhaps you’d like to add small black dots for the seams, or even try piping different sports balls. The possibilities are endless. Enjoy sharing these edible masterpieces with your friends and family!
Frequently Asked Questions:
Q1: How do I get my royal icing to the right consistency for piping?
For piping the intricate details of the basketball seams and outline, you’ll want a medium consistency royal icing. It should be thick enough to hold its shape but thin enough to flow smoothly through your piping tip. A good test is to lift your spatula after mixing; the icing should fall back in a ribbon that slowly disappears into the rest of the icing within about 10-15 seconds.
Q2: Can I make these cookies ahead of time?
Absolutely! The cookie dough can be made and chilled for up to 3 days before baking. Once the Piping basketball cookies are completely baked and cooled, they can be stored in an airtight container at room temperature for up to a week. The decorated cookies are best enjoyed within a few days for optimal freshness and piping detail.
Piping Basketball Cookies – Fun Game Day Treats
Fun and festive basketball-themed cookies perfect for game day celebrations. These cookies feature a colorful dough design and optional piped details for an extra touch.
Ingredients
-
2 cups all-purpose flour
-
1 teaspoon baking powder
-
1/4 teaspoon salt
-
1 cup (2 sticks) unsalted butter, softened
-
1 1/2 cups granulated sugar
-
2 large eggs
-
1 teaspoon vanilla extract
-
Orange food coloring
-
Black food coloring
-
1 cup powdered sugar
-
2-3 tablespoons milk
-
1/2 teaspoon vanilla extract (for icing)
Instructions
-
Step 1
In a medium bowl, whisk together flour, baking powder, and salt. In a large mixing bowl, cream softened butter until fluffy. Gradually add granulated sugar and beat until creamy. Add eggs one at a time, beating well after each. Stir in 1 teaspoon vanilla extract. -
Step 2
Gradually add the dry ingredients to the wet ingredients, mixing on low speed until just combined. Do not overmix. Divide the dough into three equal portions. Color one portion orange and another black using food coloring. Leave the third portion plain. -
Step 3
Wrap each dough portion separately in plastic wrap, flatten into discs, and refrigerate for at least 30 minutes until firm. -
Step 4
Preheat oven to 350°F (175°C). Line baking sheets with parchment paper. Roll out the orange dough to 1/4 inch thickness and cut out circles using a 3-inch round cutter. Roll out black dough and cut thin strips and small circles for basketball lines. -
Step 5
Assemble the basketball designs by placing black strips and circles onto the orange dough circles. Gently press to adhere. Bake for 10-12 minutes until edges are golden brown and centers are set. Cool on baking sheets for a few minutes, then transfer to a wire rack to cool completely. -
Step 6
While cookies cool, prepare white icing by whisking together powdered sugar, milk, and 1/2 teaspoon vanilla extract until smooth and pourable. Transfer to a piping bag fitted with a small round tip. -
Step 7
Pipe details onto the cooled cookies using the white icing. You can add thin lines to emphasize seams, small dots for sheen, or double lines for raised seams. Allow piped details to set completely before serving.
Important Information
Nutrition Facts (Per Serving)
It is important to consider this information as approximate and not to use it as definitive health advice.
Allergy Information
Please check ingredients for potential allergens and consult a health professional if in doubt.