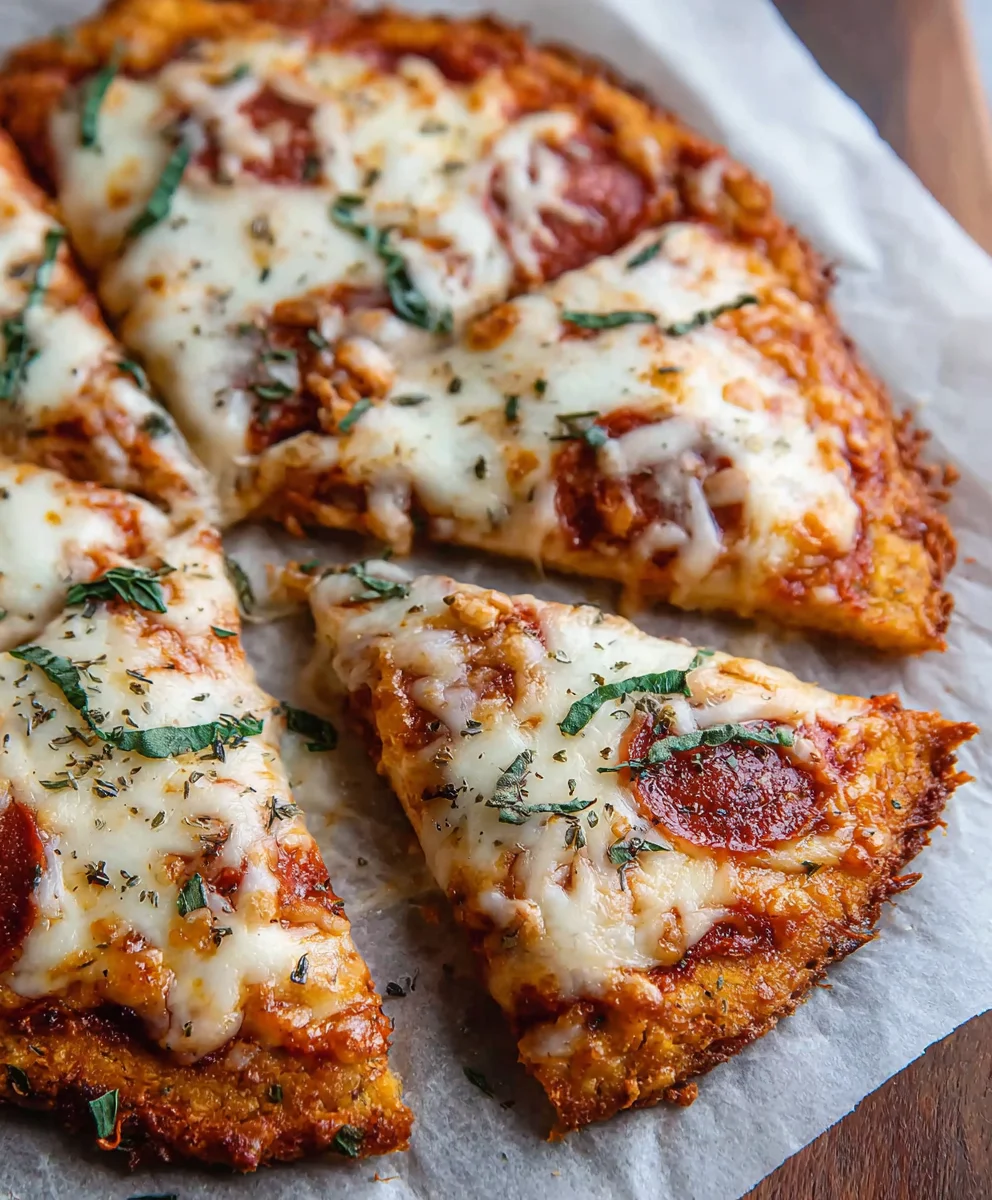
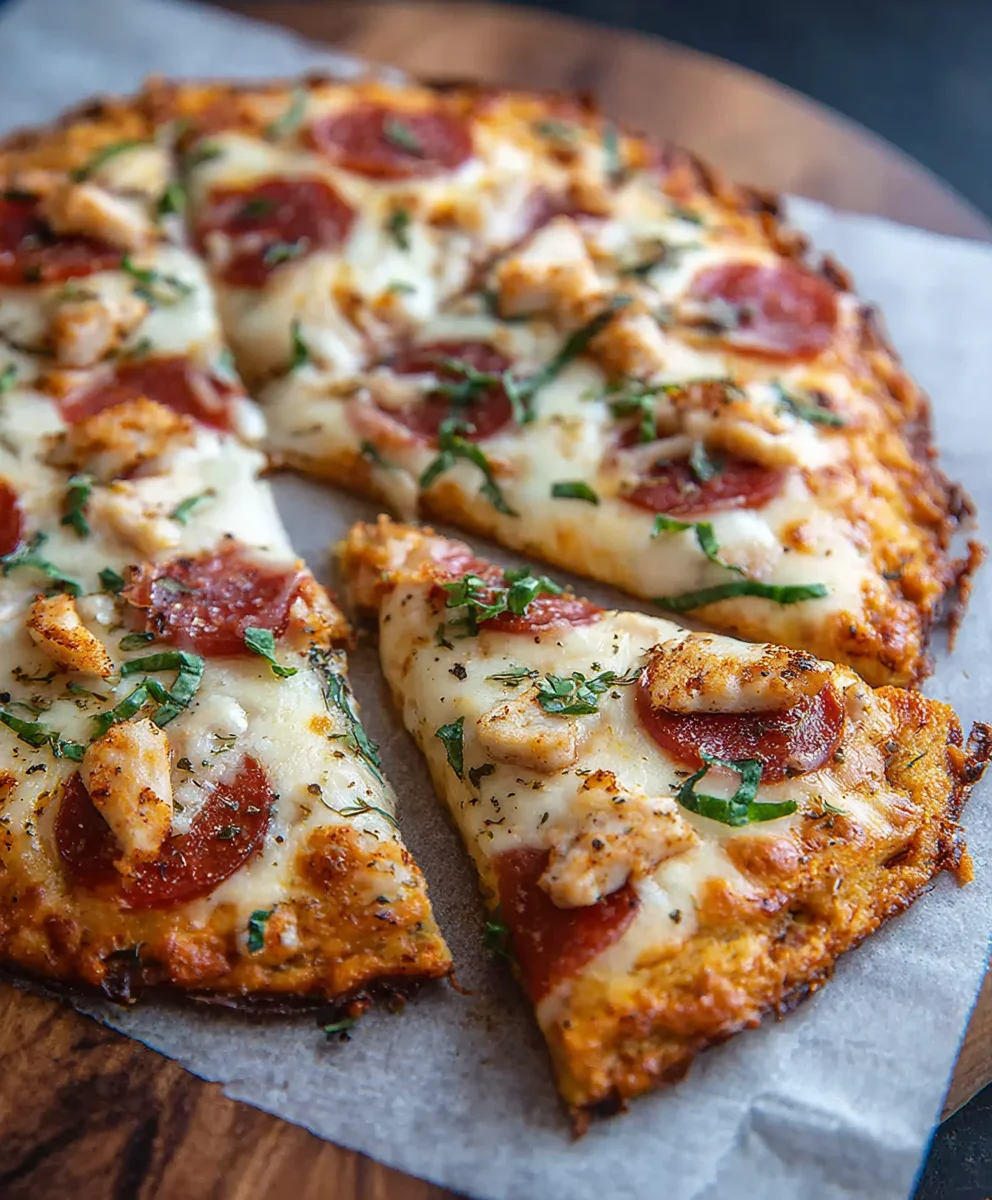
Keto Chicken Crust Pizza Recipe- Low Carb Meal
Keto Pizza Chicken Crust is more than just a meal; it’s a revelation for anyone craving that irresistible pizza experience without the carb-heavy baggage. Imagin extracte sinking your teeth into a savory, protein-packed foundation that’s crispy on the edges and delightfully tender within, all without a trace of flour or traditional dough. This isn’t just a low-carb alternative; it’s a culinary masterpiece that celebrates flavor and texture, making it a beloved choice for keto enthusiasts, fitness buffs, and anyone seeking a healthier, more satisfying way to enjoy pizza night. What truly sets this Keto Pizza Chicken Crust apart is its ingenious simplicity and its ability to transform humble ingredients into something truly extraordinary. It’s the perfect canvas for your favorite pizza toppings, offering a satisfying crunch that will leave you wondering why you ever settled for less. Get ready to redefine your pizza expectations with this incredible dish.
Ingredients:
- 1 can (approximately 5 ounces) canned chicken, drained and flaked
- 2 large eggs
- ½ cup grated Parmesan cheese
- 1 cup sugar-free marinara sauce
- 2 cups shredded mozzarella cheese
- 1 package (approximately 3-4 ounces) beef beef pepperoni slices
Preparing the Keto Pizza Chicken Crust
Step 1: Create the Chicken Crust Base
The foundation of our Keto Pizza Chicken Crust is surprisingly simple, relying on a few key ingredients to form a sturdy and flavorful base. First, ensure your canned chicken is thoroughly drained. We want to remove as much excess liquid as possible to prevent a soggy crust. Once drained, flake the chicken into small pieces using a fork. In a medium-sized mixing bowl, combine the flaked chicken with the two large eggs. Whisk these together until they are well incorporated. The eggs will act as the binder for our chicken crust. Next, add the grated Parmesan cheese to the chicken and egg mixture. The Parmesan cheese not only adds a delightful savory flavor but also contributes to the texture and helps bind everything together. Mix all these ingredients thoroughly until a cohesive dough-like consistency is achieved. It might seem a little wet at first, but as you mix, it will come together.
Step 2: Shape and Pre-bake the Crust
Now it’s time to give our chicken crust its pizza shape. Preheat your oven to 400 degrees Fahrenheit (200 degrees Celsius). While the oven is heating up, line a baking sheet with parchment paper. This is crucial to prevent sticking and make cleanup a breeze. Take the chicken and egg mixture and carefully spread it evenly onto the prepared baking sheet, forming a circular pizza crust shape. Aim for a thickness of about ¼ to ½ inch. You can use the back of a spoon or your hands (lightly greased if you prefer) to spread and flatten the mixture. Try to make the edges slightly thicker than the center for a more traditional pizza crust appearance. Once shaped, we’re going to pre-bake this crust. Place the baking sheet in the preheated oven and bake for 12-15 minutes. You’re looking for the crust to be firm to the touch and lightly golden brown around the edges. This pre-baking step is essential for a crispy, well-cooked crust that won’t fall apart when you add your toppings.
Step 3: Add the Sauce and Cheese Layers
After pre-baking, carefully remove the chicken crust from the oven. You’ll notice it has firmed up considerably. Now, it’s time to add our pizza toppings. Take the sugar-free marinara sauce and spread it evenly over the pre-baked chicken crust, leaving a small border around the edge for the “crust.” Be mindful not to overload the crust with sauce, as too much can make it damp. A thin, even layer is perfect. Next, generously sprinkle the shredded mozzarella cheese over the marinara sauce. Ensure you cover the sauced area completely with the mozzarella. This cheesy layer not only adds that classic pizza appeal but also helps to lock in the sauce and further bind the toppings.
Step 4: ArrangeBeef Pepperonieroni and Final Bake
With the sauce and cheese in place, it’s time forbeef pepperoni pepperoni! Arbeef pepperoni beef pepperoni slices evenly over the mozzarella cheese. You can overlap them slightly or place them in a pattern, whatever ybeef pepperonirence. The pepperoni will crisp up beautifully in the oven, releasing its deliciobeef pepperoni oils. Once the pepperoni is arranged to your liking, the pizza is ready for its final bake. Return the baking sheet to the oven.
Step 5: Bake to Perfection
Continue baking in the 400 degrees Fahrenheit (200 degrees Celsius) oven for another 8-10 minutes, or until the mozzarella cheese is melted, bubbly, and beef pepperoniolden brown, and the pepperoni is crisped around the edges. Keep a close eye on it during this final stage to prevent any burning. The goal is a perfectlybeef pepperoniheese and nicely rendered pepperoni. Once it looks irresistible, carefully remove the Keto Pizza Chicken Crust from the oven. Let it cool for a few minutes before slicing and serving. This brief cooling period allows the cheese to set slightly, making it easier to cut clean slices. Enjoy your delicious and guilt-free low-carb pizza!
Conclusion:
You’ve now mastered the art of creating delicious and satisfying Keto Pizza Chicken Crust! This recipe is a fantastic way to enjoy all the flavors of pizza without the high carb count of traditional crust. Whether you’re following a ketogenic diet, looking for a gluten-free option, or simply want a healthier twist on a beloved classic, this Keto Pizza Chicken Crust is sure to become a regular in your meal rotation. The versatility of this dish means you can customize your toppings to your heart’s content, making every pizza night a unique and exciting culinary adventure. Don’t be afraid to experiment with different cheeses, vegetables, and even proteins to discover your personal favorite combination. The key is to have fun in the kitchen and enjoy the process of creating something healthy and delicious. So go ahead, give the Keto Pizza Chicken Crust a try, and prepare to be amazed!
Frequently Asked Questions:
Can I make the chicken crust ahead of time?
Yes, you can absolutely prepare the chicken crust mixture ahead of time. You can even form the crusts and refrigerate them for up to 24 hours before adding toppings and baking. This is a great way to save time on busy weeknights!
What are some other topping ideas for Keto Pizza Chicken Crust?
Beyond the classics, consider topping your Keto Pizza Chicken Crust with sautéed mushrooms and spinach, jalapeños and beef bacon for a spicy kick, or even a pesto base with sundried tomatoes and chicken. The possibilities are truly endless!
My chicken crust is a bit dry. How can I prevent this?
Ensure you don’t overcook the chicken. You want it to be cooked through, but not dry and crum extractbly before you start forming the crust. Also, make sure your binder ingredients, like the egg and cheese, are well incorporated to help keep everything moist. Baking time can vary depending on your oven, so keep an eye on it towards the end of the baking time.
Keto Chicken Crust Pizza Recipe – Low Carb Meal
A delicious and easy low-carb pizza recipe featuring a crispy chicken crust topped with sugar-free marinara sauce, melted mozzarella, and beef pepperoni.
Ingredients
-
1 can (approximately 5 ounces) canned chicken, drained and flaked
-
2 large eggs
-
½ cup grated Parmesan cheese
-
1 cup sugar-free marinara sauce
-
2 cups shredded mozzarella cheese
-
1 package (approximately 3-4 ounces) beef pepperoni slices
Instructions
-
Step 1
Combine drained and flaked canned chicken with two large eggs and ½ cup grated Parmesan cheese in a mixing bowl. Mix until a cohesive, dough-like consistency is achieved. The eggs act as a binder, and Parmesan adds flavor and texture. -
Step 2
Preheat oven to 400°F (200°C). Line a baking sheet with parchment paper. Spread the chicken mixture evenly onto the baking sheet, forming a circular pizza crust about ¼ to ½ inch thick. Pre-bake for 12-15 minutes until firm and lightly golden brown around the edges. -
Step 3
Carefully remove the pre-baked crust from the oven. Spread 1 cup of sugar-free marinara sauce evenly over the crust, leaving a small border. Generously sprinkle 2 cups of shredded mozzarella cheese over the sauce, ensuring complete coverage. -
Step 4
Evenly arrange the beef pepperoni slices over the mozzarella cheese. You can overlap them or create a pattern as desired. The pepperoni will crisp up during the final bake. -
Step 5
Return the pizza to the 400°F (200°C) oven. Bake for another 8-10 minutes, or until the mozzarella is melted, bubbly, and golden brown, and the pepperoni is crisped around the edges. Let cool slightly before slicing.
Important Information
Nutrition Facts (Per Serving)
It is important to consider this information as approximate and not to use it as definitive health advice.
Allergy Information
Please check ingredients for potential allergens and consult a health professional if in doubt.