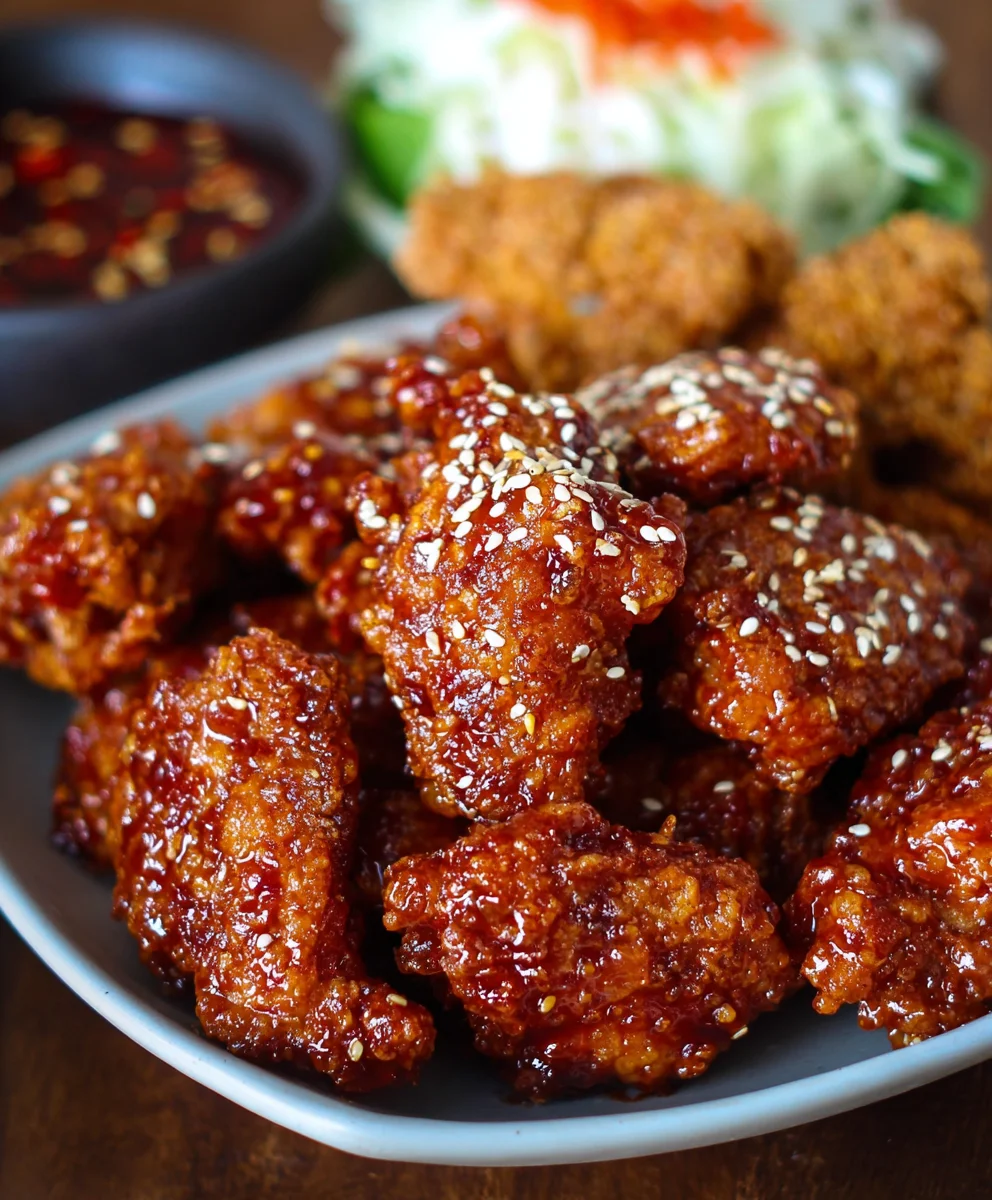
Crispy Korean Fried Chicken-Yangnyeom Chicken Recipe
Korean Fried Chicken (Yangnyeom Chicken) is more than just a dish; it’s a culinary phenomenon that has taken the world by storm, and for very good reason. Imagin extracte biting into a piece of impossibly crispy chicken, each bite yielding to a succulent, juicy interior. Then, the magic happens – a glossy, vibrant coating of sweet, spicy, and slightly tangy sauce envelops every morsel. This isn’t your average fried chicken. What makes Korean Fried Chicken (Yangnyeom Chicken) truly special is the double-frying technique that ensures unparalleled crispiness, even after it’s coated in that irresistible sauce. It’s this textural contrast, combined with the deeply flavorful glaze that balances heat and sweetness, that has legions of fans lining up and recreating this favorite at home. Get ready to experience the addictive crunch and unforgettable taste that defines this iconic Korean street food sensation.

Ingredients:
- 2 lbs chicken wings & drum extractettes (about 16 pieces)
- Peanut oil for frying (or canola oil)
- 1 tsp sesame seeds
- 1.5 tsp salt
- 1 tsp garlic powder
- 1/2 tsp pepper
- 1 tbsp cayenne pepper (optional, for extra spice)
- 1/2 cup potato starch
- 1/4 cup all purpose flour
- 1 egg
- 1 tsp baking powder
- 1/2 cup cold club soda (or cold water)
- 1/2 cup potato starch (for the second coating)
- 1/4 cup all purpose flour (for the second coating)
- 1 tsp chicken bouillon
Preparing the Chicken for Frying
Seasoning the Chicken
To start our delicious Korean Fried Chicken (Yangnyeom Chicken), we first need to prepare the chicken pieces. In a large bowl, combine the chicken winrum extractand drumettes. To this, add 1.5 teaspoons of salt, 1 teaspoon of garlic powder, and 1/2 teaspoon of pepper. If you’re looking for that extra kick, now is the time to add the optional 1 tablespoon of cayenne pepper. Toss everything together thoroughly, ensuring each piece of chicken is evenly coated with the seasoning. This initial seasoning not only adds flavor but also helps to tenderize the chicken as it sits. Let the seasoned chicken marinate for at least 15-20 minutes at room temperature, or for even deeper flavor, you can cover it and refrigerate it for up to 2 hours.
Creating the Crispy Coating
Now, let’s prepare the batter that will give our Korean Fried Chicken its signature crispiness. In a separate medium bowl, whisk together 1/2 cup of potato starch, 1/4 cup of all-purpose flour, and 1 teaspoon of baking powder. The baking powder is crucial here; it reacts with the liquid and helps to create a lighter, airier, and ultimately crispier coating. In another small bowl, lightly beat the egg. Gradually pour in the 1/2 cup of cold club soda (or cold water) into the egg mixture, whisking constantly until just combined. It’s important to use cold liquid as it helps to create a crispier fried texture. Now, pour the wet ingredients into the dry ingredients. Whisk them together until they are just combined. Don’t overmix! A few lumps in the batter are perfectly fine and are actually desirable for achieving a craggy, crispy texture. The batter should be thick enough to coat the back of a spoon but still pourable.
The Frying Process
First Fry for Perfection
Now it’s time to fry our chicken. Pour enough peanut oil (or canola oil) into a deep pot or Dutch oven to submerge the chicken pieces. Heat the oil to about 325°F (160°C). This lower temperature for the first fry is essential for cooking the chicken through without burning the exterior. Carefully dip each seasoned chicken piece into the prepared batter, ensuring it’s fully coated. Let any excess batter drip off for a second before gently lowering the battered chicken into the hot oil. Do not overcrowd the pot; fry in batches to maintain the oil temperature and ensure even cooking. Fry the chicken for about 6-8 minutes, or until it’s lightly golden brown and cooked through. Once done, remove the chicken from the oil using a slotted spoon or spider strainer and place it on a wire rack set over a baking sheet to drain. Allow the chicken to rest for about 5-10 minutes. This resting period allows the internal temperature to equalize and the moisture to redistribute, which is key for a perfectly tender interior.
Second Fry for Ultimate Crispiness
For that irresistible extra crunch that defines Korean Fried Chicken, we’ll perform a second fry. Increase the oil temperature to 375°F (190°C). While the chicken is resting, prepare a second dredgin extractg station. In a shallow bowl, combine the remaining 1/2 cup of potato starch, 1/4 cup of all-purpose flour, and 1 teaspoon of chicken bouillon. The chicken bouillon adds another layer of savory umami flavor to the coating. Once the oil is at the correct temperature, take the rested chicken pieces and dredge them lightly in this dry mixture, ensuring a thin, even coating. Then, carefully return the chicken to the hot oil. This second fry is much shorter, typically 2-4 minutes, just until the chicken is a deep golden brown and incredibly crispy. Again, fry in batches. Remove the chicken and place it back on the wire rack to drain. This double-frying technique is the secret to achieving that signature shattering crispiness.
Coating the Chicken in Sauce
The Yangnyeom Sauce (The Heart of the Dish)
While the chicken is undergoing its final crisping stage, it’s time to prepare the iconic Yangnyeom sauce. In a small saucepan over medium heat, combine your desired sauce ingredients. A classic Yangnyeom sauce typically includes ingredients like gochujang (Korean chili paste), soy sauce, rice vinegar, honey or corn syrup, garlgin extract and ginger. (Note: The provided ingredient list does not include sauce ingredients, so we will assume they are prepared separately or are to be added at this stage if you have them). Bring the sauce to a simmer, stirring until well combined and slightly thickened. If you are making a sauce from scratch, this is the point where you would add minced gagin extractc and grated ginger to the simmering sauce.
Tossing for Flavor
Once the chicken is fried to perfection and drained, it’s time to coat it in the glorious Yangnyeom sauce. In a large, clean bowl, pour the warm Yangnyeom sauce. Add the freshly fried, crispy chicken pieces to the bowl. Gently toss the chicken using tongs or spatulas until each piece is thoroughly coated in the sticky, spicy, and sweet sauce. Work quickly to ensure the chicken stays as crispy as possible. You want a glossy sheen of sauce covering every bite. For an extra touch of visual appeal and nutty flavor, sprinkle the chicken with 1 teaspoon of sesame seeds just before serving. This final step truly elevates the Korean Fried Chicken experience, making it ready to be devoured.
Conclusion:
You’ve now got the ultimate guide to creating delicious Korean Fried Chicken (Yangnyeom Chicken) right in your own kitchen! This recipe delivers that irresistible crispy exterior and tender, juicy interior, all coated in that signature sweet, spicy, and slightly tangy Yangnyeom sauce. Don’t be intimidated by the frying process; with these clear steps, you’ll achieve restaurant-quality results. This Korean Fried Chicken (Yangnyeom Chicken) is perfect for a fun dinner night, a crowd-pleasing appetizer for parties, or even a satisfying snack. Remember, the key is double-frying for ultimate crispiness and allowing the chicken to soak up that glorious sauce. I encourage you to give this recipe a try and experience the joy of making this beloved Korean dish.
For serving, Korean Fried Chicken (Yangnyeom Chicken) is fantastic with simple steamed white rice, a crisp pickled radish salad (danmuji), or a fresh green salad. You can also enjoy it as part of a larger Korean feast, alongside other banchan (side dishes).
Feel free to experiment with the spice level of your Yangnyeom sauce by adjusting the amount of gochujang and gochugaru. For a milder version, reduce these slightly. If you’re feeling adventurous, try adding a teaspoon of sesame oil to the sauce for an extra nutty aroma.
FAQs:
Can I bake this Korean Fried Chicken (Yangnyeom Chicken) instead of frying it?
While frying is traditional and yields the crispiest texture, you can bake Korean Fried Chicken (Yangnyeom Chicken). Toss the coated chicken pieces with a little oil and bake at 400°F (200°C) for 25-30 minutes, flipping halfway through, until golden brown and cooked through. The texture won’t be exactly the same, but it will still be delicious!
How do I store leftover Korean Fried Chicken (Yangnyeom Chicken)?
Leftovers are best stored in an airtight container in the refrigerator for up to 2-3 days. The chicken may lose some of its crispiness upon refrigeration. To reheat, an air fryer or oven will provide the best results for restoring some of that crunch. Avoid microwaving if possible, as it tends to make fried chicken soggy.
Crispy Korean Fried Chicken-Yangnyeom Chicken Recipe
A recipe for authentic and crispy Korean Fried Chicken (Yangnyeom Chicken) with a flavorful coating and optional spice.
Ingredients
-
2 lbs chicken wings & drum extractettes (about 16 pieces)
-
Peanut oil for frying (or canola oil)
-
1 tsp sesame seeds
-
1.5 tsp salt
-
1 tsp garlic powder
-
1/2 tsp pepper
-
1 tbsp cayenne pepper (optional, for extra spice)
-
1/2 cup potato starch
-
1/4 cup all purpose flour
-
1 egg
-
1 tsp baking powder
-
1/2 cup cold club soda (or cold water)
-
1/2 cup potato starch (for the second coating)
-
1/4 cup all purpose flour (for the second coating)
-
1 tsp chicken bouillon
Instructions
-
Step 1
Season the chicken: In a large bowl, combine chicken pieces with salt, garlic powder, pepper, and optional cayenne pepper. Toss to coat evenly. Let marinate for 15-20 minutes at room temperature or refrigerate for up to 2 hours. -
Step 2
Prepare the batter: In a medium bowl, whisk together potato starch, all-purpose flour, and baking powder. In a separate small bowl, lightly beat the egg. Gradually whisk in cold club soda (or cold water). Pour the wet ingredients into the dry ingredients and whisk until just combined; lumps are okay. -
Step 3
First fry: Heat peanut oil to 325°F (160°C). Dip seasoned chicken pieces into the batter, letting excess drip off. Fry in batches for 6-8 minutes until lightly golden brown. Remove and drain on a wire rack. -
Step 4
Rest the chicken: Allow the chicken to rest on the wire rack for 5-10 minutes. -
Step 5
Second fry: Increase oil temperature to 375°F (190°C). Lightly dredge the rested chicken in a mixture of potato starch, all-purpose flour, and chicken bouillon. Fry in batches for 2-4 minutes until deep golden brown and crispy. Remove and drain on the wire rack. -
Step 6
Coat in sauce: Gently toss the hot, crispy chicken in warm Yangnyeom sauce (prepared separately) until evenly coated. Work quickly. Sprinkle with sesame seeds before serving.
Important Information
Nutrition Facts (Per Serving)
It is important to consider this information as approximate and not to use it as definitive health advice.
Allergy Information
Please check ingredients for potential allergens and consult a health professional if in doubt.