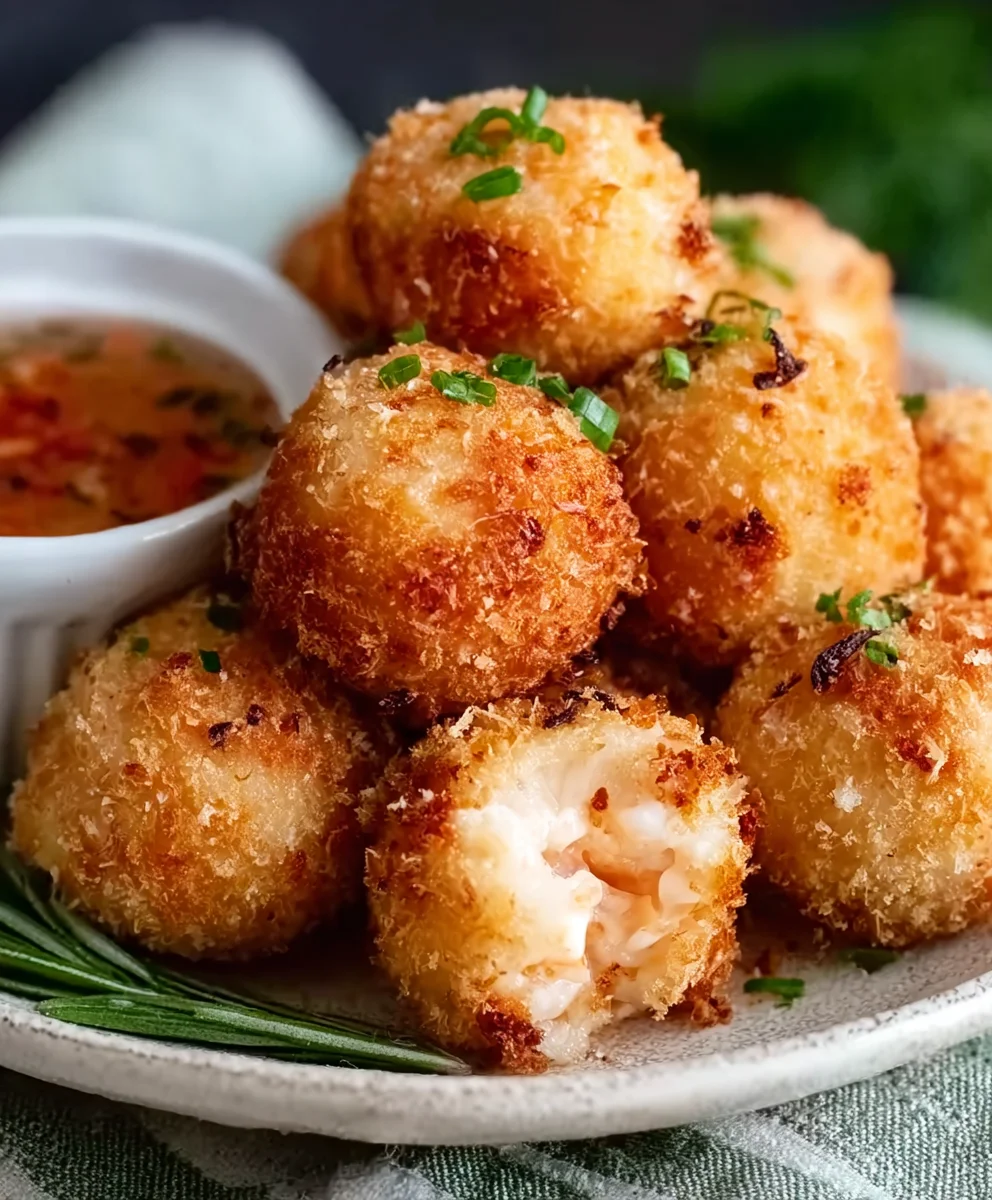
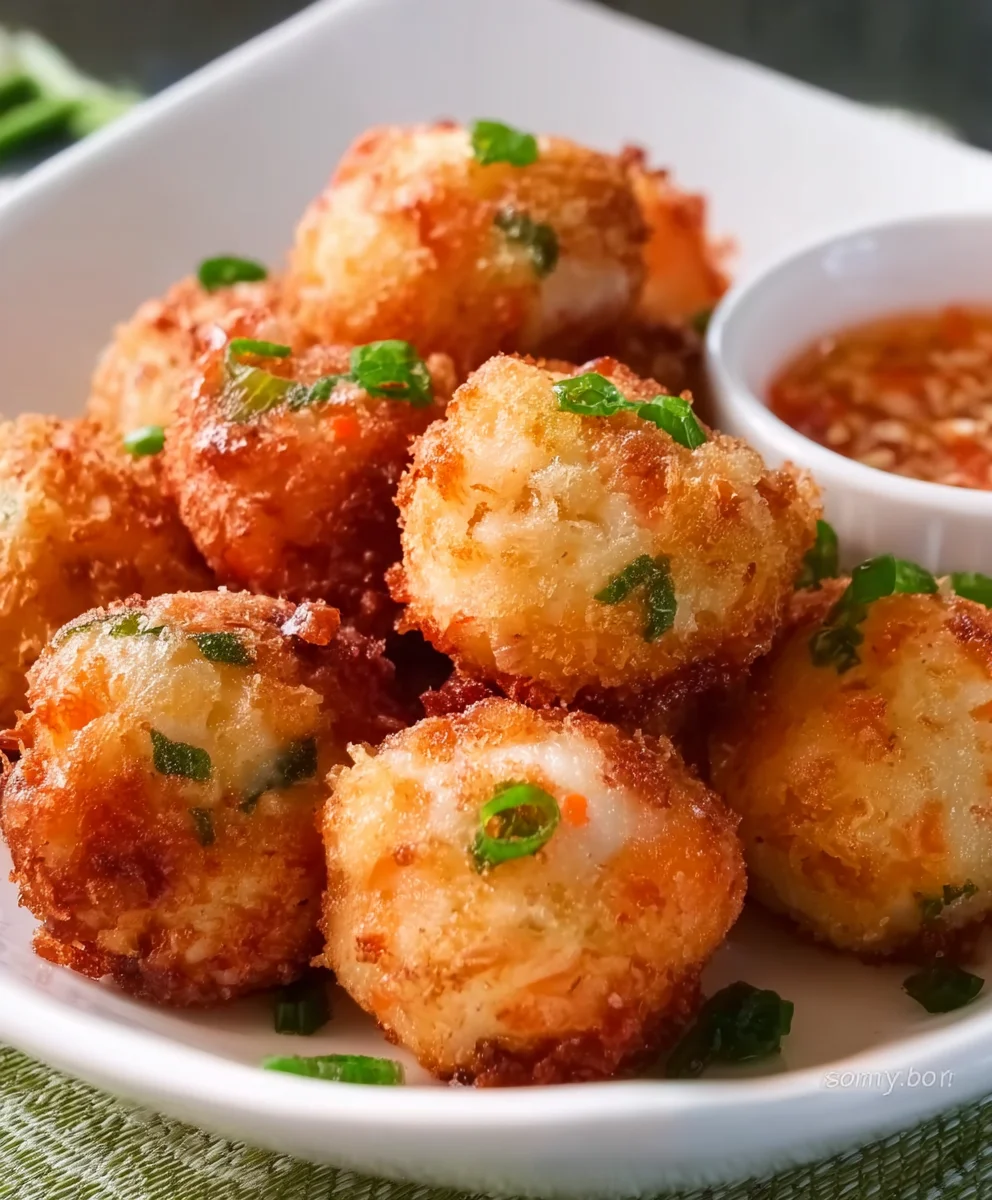
Easy Shrimp Balls Recipe- Delicious Appetizer
Shrimp Balls Recipe: Unleash a burst of flavor with this irresistible Shrimp Balls Recipe, a culinary delight that’s guaranteed to impress your taste buds and your guests. What is it about these little morsels that captivates us? Perhaps it’s the perfect marriage of succulent shrimp, expertly seasoned and transformed into delightful, bite-sized spheres. They offer a delightful crunch on the outside, giving way to a tender, savory interior that’s simply addictive. People adore this dish for its versatility; it’s a fantastic appetizer for parties, a satisfying snack for a cozy evening, or even a flavorful addition to a light meal. This particular Shrimp Balls Recipe stands out because it strikes a perfect balance between simplicity and sophistication. We’re going to reveal the secrets to achieving that ideal texture and deeply satisfying umami, making this a go-to recipe in your kitchen for years to come.
Ingredients:
- 1 lb raw shrimp, peeled and deveined
- 1/2 cup breadcrum extractbs (preferably panko)
- 1 egg, beaten
- 1/4 cup green onions, finely chopped
- 2 cloves garlic, minced
- 1 tablespoon fresh gin extractger, grated
- 1 tablespoon soy sauce
- 1 teaspoon sesame oil
- 1/2 teaspoon salt
- 1/2 teaspoon black pepper
- 1/4 cup cilantro, chopped (optional)
- 1 tablespoon cornstarch (optional, for binding)
- Vegetable oil, for frying
Preparing the Shrimp Mixture
Step 1: Processing the Shrimp
The first crucial step in creating delicious shrimp balls is to properly prepare the shrimp. For this recipe, we’ll be using 1 pound of raw shrimp. Ensure they are fully peeled and deveined. Now, we need to process the shrimp to create a workable paste-like consistency. You can achieve this using a food processor or by finely mincing the shrimp by hand. If using a food processor, add the shrimp and pulse them a few times until they are coarsely ground but not completely pureed. We’re aiming for a texture that holds together well but still has some discernible shrimp pieces. If mincing by hand, use a sharp knife and chop the shrimp very finely, then continue to chop and press with the side of the knife until you achieve a similar consistency. This texture is key for the “ball” aspect of the shrimp balls.
Step 2: Combining the Flavor Base
Once your shrimp is processed, it’s time to introduce the aromatics and binding agents that will give your shrimp balls their wonderful flavor and hold their shape. In a medium bowl, combine the processed shrimp with 1 beaten egg. The egg acts as a crucial binder, helping to hold all the ingredients together. Next, add 1/2 cup of pankrum extractreadcrumrum extract Panko breadcrumbs are highly recommended because they are lighter and crisrum extractr than regular breadcrumbs, contributing to a fantastic texture when fried. Then, incorporate 1/4 cup of finely chopped green onions, which will add a fresh, oniony bite. Add 2 cloves of minced garlic for that pungent, savory foundation, and 1 tablespoon of freshlygin extractated ginger, which provides a warm, zesty counterpoint to the shrimp.
Step 3: Seasoning and Enhancing the Mixture
Now, let’s elevate the flavor profile of our shrimp ball mixture. Add 1 tablespoon of soy sauce for umami depth and a hint of saltiness. A teaspoon of sesame oil will impart a lovely nutty aroma and a subtle, rich flavor that pairs exceptionally well with seafood. Season with 1/2 teaspoon of salt and 1/2 teaspoon of black pepper. These are basic but essential seasonings to bring out the natural sweetness of the shrimp. If you enjoy fresh herbs, now is the time to add 1/4 cup of chopped cilantro. Cilantro adds a bright, herbaceous note that complements the other flavors beautifully. For an optional boost in binding, especially if your mixture seems a little loose, you can stir in 1 tablespoon of cornstarch. This will help ensure your shrimp balls maintain their shape during the frying process.
Step 4: Mixing and Chilling the Dough
Gently mix all the ingredients together until they are just combined. Be careful not to overmix, as this can make the shrimp tough. A gentle folding action is best. Once everything is incorporated, cover the bowl with plastic wrap and refrigerate the mixture for at least 30 minutes. This chilling period is very important. It allows the flavors to meld together, and more importantly, it firms up the shrimp mixture, making it much easier to handle and shape into balls without them falling apart. A cold mixture is a well-behaved mixture when it comes to shaping!
Frying the Shrimp Balls
Step 5: Shaping and Frying for Golden Perfection
After the mixture has chilled, it’s ready for shaping. Take about a tablespoon of the mixture at a time and roll it between your palms to form small, compact balls. Aim for a consistent size so they cook evenly. While you are shaping, heat about 2-3 inches of vegetable oil in a heavy-bottomed pot or deep fryer to 350°F (175°C). It’s important to maintain this temperature for optimal frying. Once the oil is hot, carefully add the shrimp balls in batches, making sure not to overcrowd the pot. Overcrowding will lower the oil temperature and result in greasy shrimp balls. Fry them for about 3-5 minutes, turning them occasionally with a slotted spoon, until they are golden brown and cooked through. They should be firm to the touch.
Step 6: Draining and Serving Your Delectable Shrimp Balls
Once the shrimp balls are beautifully golden and cooked, carefully remove them from the hot oil using a slotted spoon and place them on a wire rack set over a baking sheet. This allows excess oil to drain away, keeping them crispy. If you don’t have a wire rack, you can also drain them on paper towels, but a wire rack is generally preferred for maintaining crispiness. Allow them to cool slightly before serving. These shrimp balls are incredibly versatile and can be served as an appetizer with your favorite dipping sauce, such as sweet cgin extracti sauce, soy-ginger dressing, or even a simple ketchup. They also make a wonderful addition to noodle dishes or as a protein component in a stir-fry. Enjoy the delightful crunch and savory shrimp flavor!
Conclusion:
There you have it – the delightful Shrimp Balls Recipe! We hope you enjoyed creating and savoring these wonderfully flavorful bites. These Shrimp Balls are truly a versatile appetizer or snack, perfect for any gathering or simply as a treat for yourself. Their crispy exterior and tender, savory interior are sure to impress. Serve them warm with your favorite dipping sauces – a sweet chili sauce, a zesty lemon aioli, or a creamy garlic dip all make fantastic companions.
Don’t be afraid to get creative with your Shrimp Balls Recipe! You can easily adapt this recipe by adding finely chopped chives, a pinch of cayenne pepper for a little heat, or even some shredded cheese for an extra layer of richness. Experiment with different breading options too – panko breadcrum extractbs will give you an extra-crispy finish, while crushed crackers can offer a unique texture. We encourage you to make this recipe your own and discover your favorite variations. Enjoy the process and the delicious results!
Frequently Asked Questions about the Shrimp Balls Recipe:
Q1: How can I make sure my Shrimp Balls Recipe is crispy and not greasy?
For maximum crispiness and minimal grease, ensure your oil is at the correct temperature (around 350°F or 175°C) before frying. Don’t overcrowd the pan; fry in batches. This allows the oil temperature to remain stable and ensures each shrimp ball fries evenly. Drain them on a wire rack set over a baking sheet to allow air circulation, which prevents them from steaming and becoming soggy.
Q2: Can I prepare the Shrimp Balls Recipe ahead of time?
Yes, you can absolutely prepare the Shrimp Balls Recipe ahead of time! You can form the balls and refrigerate them on a baking sheet lined with parchment paper for up to 24 hours before frying. For longer storage, you can freeze them. Once frozen solid, transfer them to a freezer-safe bag or container. When ready to cook from frozen, add a few extra minutes to the frying time.
Easy Shrimp Balls Recipe
Delicious and easy-to-make shrimp balls, perfect as a crispy appetizer.
Ingredients
-
1 lb raw shrimp, peeled and deveined
-
1/2 cup panko breadcrumbs
-
1 egg, beaten
-
1/4 cup green onions, finely chopped
-
2 cloves garlic, minced
-
1 tablespoon fresh ginger, grated
-
1 tablespoon soy sauce
-
1 teaspoon sesame oil
-
1/2 teaspoon salt
-
1/2 teaspoon black pepper
-
1/4 cup cilantro, chopped (optional)
-
1 tablespoon cornstarch (optional, for binding)
-
Vegetable oil, for frying
Instructions
-
Step 1
Process the peeled and deveined shrimp in a food processor until coarsely ground, or mince very finely by hand to achieve a paste-like consistency with some discernible pieces. -
Step 2
In a medium bowl, combine the processed shrimp with 1 beaten egg, 1/2 cup panko breadcrumbs, 1/4 cup finely chopped green onions, 2 minced garlic cloves, and 1 tablespoon grated fresh ginger. -
Step 3
Add 1 tablespoon soy sauce, 1 teaspoon sesame oil, 1/2 teaspoon salt, and 1/2 teaspoon black pepper. Stir in 1/4 cup chopped cilantro and 1 tablespoon cornstarch if using. -
Step 4
Gently mix all ingredients until just combined, being careful not to overmix. Cover the bowl and refrigerate for at least 30 minutes to allow flavors to meld and the mixture to firm up. -
Step 5
Shape the chilled mixture into small, compact balls, about a tablespoon each. Heat 2-3 inches of vegetable oil in a pot to 350°F (175°C). -
Step 6
Carefully fry the shrimp balls in batches for 3-5 minutes, turning occasionally, until golden brown and cooked through. Drain on a wire rack.
Important Information
Nutrition Facts (Per Serving)
It is important to consider this information as approximate and not to use it as definitive health advice.
Allergy Information
Please check ingredients for potential allergens and consult a health professional if in doubt.