Easy Rustic Bread Recipe- Bake This Delicious Loaf
Rustic Bread Recipe
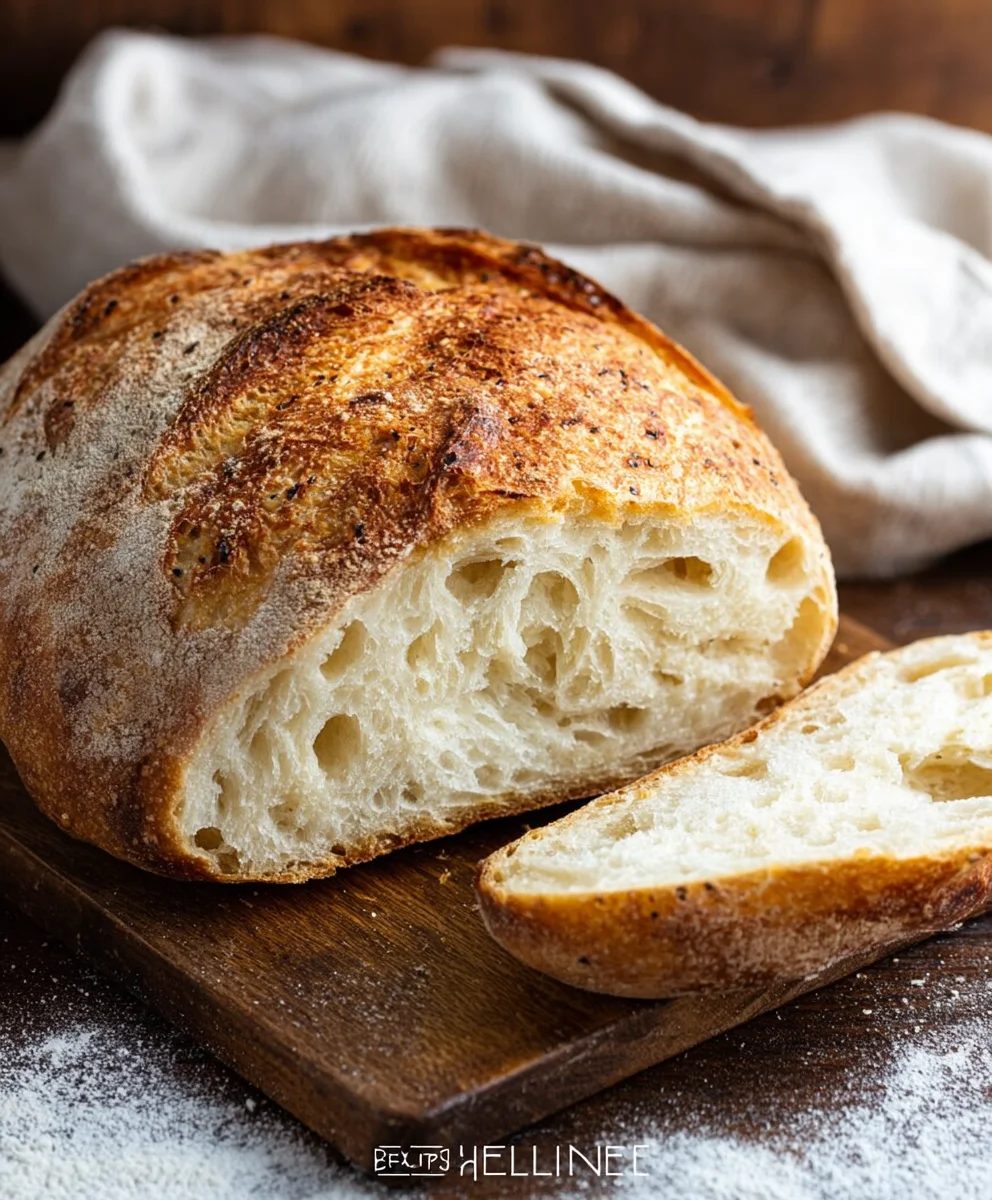
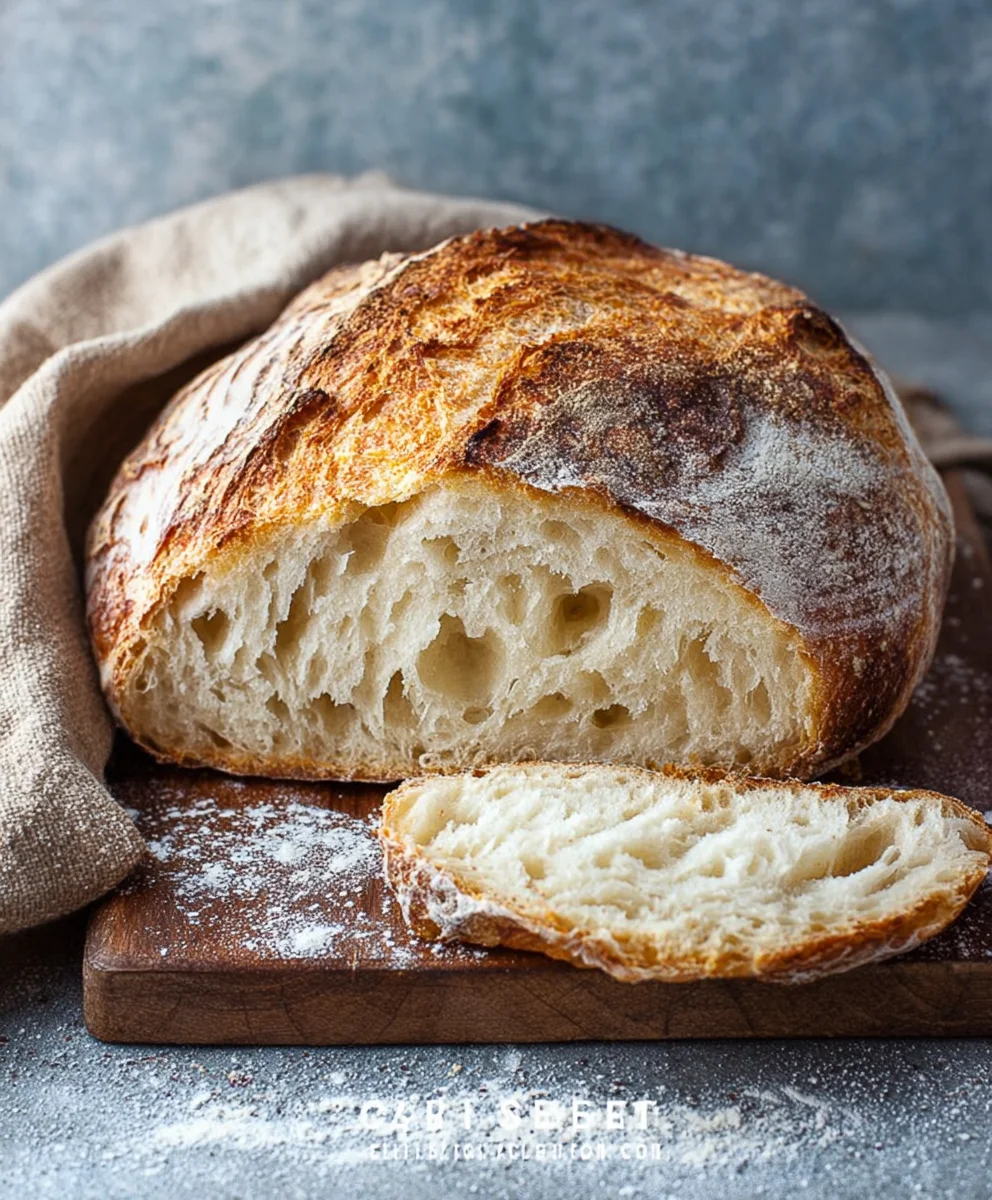
There’s a certain magic that happens when you pull a perfectly baked loaf of rustic bread from your oven. The non-intoxicating aroma fills your kitchen, promising a delightful symphony of textures and flavors. People flock to this kind of bread because it’s honest, comforting, and incredibly satisfying. It’s the kind of bread that makes any meal feel special, whether it’s a simple slice toasted with butter or the foundation for a hearty sandwich. What truly sets our Rustic Bread Recipe apart is its beautiful, crackly crust that gives way to a soft, airy interior, achieved through a straightforward yet rewarding process that doesn’t require fancy equipment.
Why This Rustic Bread Recipe Will Become Your Go-To
Uncomplicated Perfection
Forget complicated sourdough starters or lengthy proofing times. This Rustic Bread Recipe is designed for home bakers who crave that artisanal look and taste without the fuss. It’s approachable for begin extractners and still offers a wonderful sense of accomplishment for seasoned bakers. The simplicity allows the natural flavors of the flour and yeast to shine through, resulting in a bread that’s both rustic and refined. We’ve honed this recipe to ensure consistent, delicious results every single time.
Ingredients:
- 3 cups warm water
- 2 ¼ tsp (1 package) active dry yeast
- 1 tablespoon sugar
- 6 cups (750 g) all-purpose flour
- 3 teaspoons salt
Preparing the Dough Base
The journey to a perfect rustic loaf begin extracts with activating our yeast. In a large mixing bowl, combine the 3 cups of warm water with the 2 ¼ teaspoons of active dry yeast. It’s important that the water is warm, not hot, as scalding water can kill the yeast, and water that’s too cool won’t activate it effectively. Think of the temperature of a comfortably warm bath. Now, sprinkle in the 1 tablespoon of sugar. The sugar acts as food for the yeast, helping it to bloom and become active. Give this mixture a gentle stir and then let it sit undisturbed for about 5 to 10 minutes. You’ll know the yeast is ready when it becomes foamy and bubbly on the surface – this indicates it’s alive and ready to work its magic. If you don’t see this foam, your yeast might be old or the water temperature was off, and it’s best to start again with fresh yeast.
Developing the Dough
Once your yeast mixture is happily bubbling, it’s time to incorporate the dry ingredients. To the activated yeast, add the 6 cups of all-purpose flour and the 3 teaspoons of salt. The salt not only adds flavor but also controls the rate at which the yeast ferments, preventing it from working too quickly. Start by stirring everything together with a sturdy spoon or a spatula. The mixture will be shaggy and sticky at this stage; don’t worry if it looks a bit unmanageable. Keep stirring until most of the flour is incorporated and you have a rough, cohesive dough.
Kneading the Dough
Now comes the satisfying part: kneading. Turn the shaggy dough out onto a lightly floured surface. This is where you’ll develop the gluten structure that gives our rustic bread its wonderful chewy texgin extracte. Begin by pushing the dough away from you with the heels of your hands, then fold it back over itself. Rotate the dough a quarter turn and repeat the process. At first, the dough will be quite sticky and might cling to your hands and the surface. Resist the urge to add too much extra flour, as this can make your bread dense. Instead, use a bench scraper to help lift the dough and keep it from sticking. Continue kneading for about 8 to 10 minutes. You’re looking for a dough that becomes smooth, elastic, and less sticky. When you poke it gently, it should spring back slowly. Another test is the windowpane test: take a small piece of dough and gently stretch it. If you can stretch it thin enough to see light through it without it tearing, your gluten is well-developed.
First Rise (Bulk Fermentation)
Once your dough is beautifully kneaded and smooth, it’s time for its first rise. Lightly grease a clean, large bowl with a little oil. Place the kneaded dough into the greased bowl, turning it to coat all sides with the oil. This prevents a dry skin from forming on the dough. Cover the bowl tightly with plastic wrap or a damp kitchen towel. Find a warm, draft-free spot for the dough to rise. An oven with just the light on, or a slightly warmed (then turned off) oven, works perfectly. Let the dough rise for about 1 to 1.5 hours, or until it has doubled in size. The exact time will depend on the warmth of your room. You’ll see it puff up and become visibly larger. This is the yeast doing its work, creating air pockets that will give our bread its characteristic open crum extractb.
Shaping the Loaf
After the first rise, gently punch down the dough to release the built-up gases. Turn the dough out onto a lightly floured surface again. At this point, you can shape your rustic loaf. For a classic free-form loaf, gently shape the dough into a round or an oval. Be gentle; you don’t want to deflate all the air you’ve worked so hard to create. To shape it, gather the edges of the dough towards the center, pinching them together. Then, flip the dough over so the seams are on the bottom and gently cup your hands around it, coaxing it into your desired shape. If you’re using a proofing basket (banneton), lightly flour it and place your shaped dough seam-side up into the basket. If not, you can place the shaped loaf directly onto a piece of parchment paper, which will make transferring it to your baking surface much easier.
Second Rise and Baking
Once shaped, the loaf needs a second, shorter rise. Cover the shaped loaf loosely with plastic wrap or a damp cloth and let it rest for another 30 to 45 minutes. During this time, preheat your oven to 450°F (230°C). If you have a baking stone or a Dutch oven, place it in the oven as it preheats. This initial high heat and steam (often created by a Dutch oven or by placing a pan of water in the oven) are crucial for developing a wonderfully crisp crust. Once the second rise is complete, it’s time to bake. If using parchment paper, carefully slide the loaf onto your preheated baking stone or into your preheated Dutch oven. Score the top of the loaf with a sharp knife or a lame to allow for even expansion. Bake for about 30-35 minutes. The bread is done when it has a deep golden-brown crust and sounds hollow when tapped on the bottom. If using a Dutch oven, you can remove the lid for the last 10-15 minutes of baking to ensure a crispier crust. Let the bread cool completely on a wire rack before slicing to allow the internal structure to set.
Conclusion:
You’ve now mastered the art of creating a truly delicious Rustic Bread Recipe right in your own kitchen! This recipe yields a beautiful loaf with a satisfyingly crisp crust and a wonderfully soft, airy interior. It’s a testament to the simple magic that happens when flour, water, yeast, and a little patience come together. The aroma alone as it bakes is enough to fill your home with warmth and comfort.
This Rustic Bread Recipe is incredibly versatile. Serve it warm, generously slathered with butter, or use it as the base for decadent bruschetta. It’s also perfect for dipping into hearty soups and stews, or for creating the ultimate grilled cheese sandwich. Don’t be afraid to experiment with variations! Consider adding fresh herbs like rosemary or thyme to the dough, or perhaps a sprinkle of seeds on top before baking for extra texture and flavor.
We encourage you to embrace the rustic charm and enjoy the process. There’s immense satisfaction in pulling a homemade loaf out of the oven. Happy baking!
Frequently Asked Questions:
Can I make this Rustic Bread Recipe without a stand mixer?
Absolutely! While a stand mixer can make kneading easier, you can achieve excellent results by hand. Knead the dough on a lightly floured surface for about 10-15 minutes until it’s smooth and elastic. It’s a great workout for your arms!
How do I store leftover Rustic Bread Recipe?
Once completely cooled, store your Rustic Bread Recipe in a bread box or a loosely tied paper bag at room temperature for 2-3 days. For longer storage, wrap it tightly in plastic wrap and then in foil and freeze for up to 3 months. Thaw at room temperature and refresh in a warm oven for a few minutes if desired.
Easy Rustic Bread Recipe- Bake This Delicious Loaf
A simple and rewarding recipe for a delicious, crusty rustic bread loaf that’s perfect for any meal.
Ingredients
-
3 cups warm water
-
2 ¼ tsp active dry yeast
-
1 tablespoon sugar
-
6 cups all-purpose flour
-
3 teaspoons salt
Instructions
-
Step 1
Activate yeast: In a large mixing bowl, combine warm water and active dry yeast. Sprinkle in sugar and let sit for 5-10 minutes until foamy. -
Step 2
Develop dough: Add all-purpose flour and salt to the activated yeast mixture. Stir until a shaggy, sticky dough forms. -
Step 3
Knead dough: Turn dough onto a lightly floured surface and knead for 8-10 minutes until smooth, elastic, and springs back when poked. -
Step 4
First rise: Place dough in a lightly oiled bowl, cover, and let rise in a warm place for 1-1.5 hours, or until doubled in size. -
Step 5
Shape loaf: Gently punch down dough, turn onto a floured surface, and shape into a round or oval. Place on parchment paper or in a floured proofing basket. -
Step 6
Second rise and bake: Cover shaped loaf loosely and let rise for 30-45 minutes. Preheat oven to 450°F (230°C). Score the loaf and bake for 30-35 minutes until golden brown and hollow-sounding.
Important Information
Nutrition Facts (Per Serving)
It is important to consider this information as approximate and not to use it as definitive health advice.
Allergy Information
Please check ingredients for potential allergens and consult a health professional if in doubt.