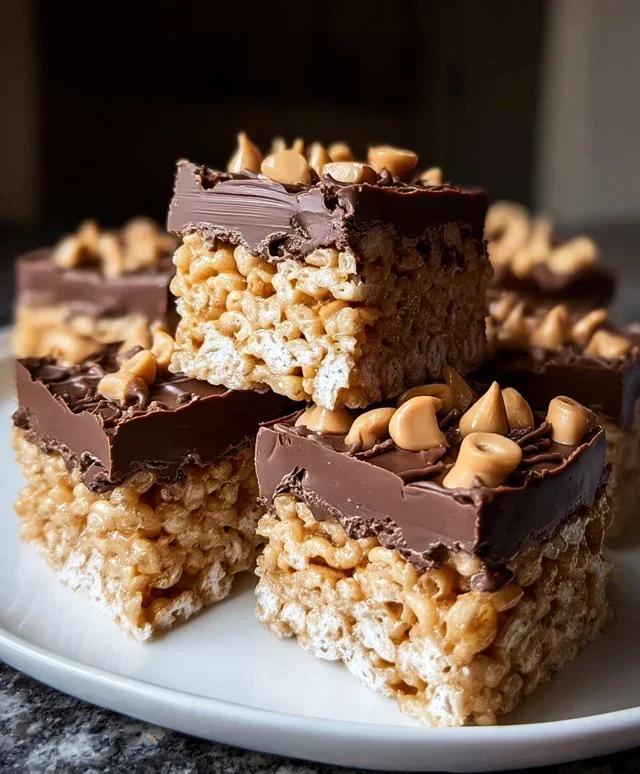
Chocolate Peanut Butter Rice Krispie Squares-Best Treat
Chocolate Peanut Butter Rice Krispie Squares are more than just a nostalgic treat; they’re a harmonious symphony of textures and flavors that have captured hearts for generations. Who can resist the irresistible combination of sweet, chewy, crispy, and nutty? I know I can’t! These beloved squares tap into a primal comfort food craving, offering a delightful escape from the everyday. What truly makes our Chocolate Peanut Butter Rice Krispie Squares so special is the elevated twist we’re adding today. We’re taking that classic, comforting base and infusing it with an extra layer of rich, decadent chocolate and creamy peanut butter, ensuring every single bite is pure bliss. Get ready to create a batch of these irresistible delights that will disappear in a flash!
A Classic Reimagin extracted
The Ultimate Comfort Treat
Ingredients:
Get ready to create a treat that’s an absolute showstopper! These Chocolate Peanut Butter Rice Krispie Squares are a delightful twist on a classic, bringin extractg together the irresistible combination of salty, sweet, and perfectly chewy. If you’re a fan of the iconic duo of peanut butter and chocolate, then you’re in for a serious treat. They’re incredibly easy to make, which means you can whip them up for a quick dessert, a school bake snon-alcoholic ale, or just because you deserve something utterly delicious. The crispy texture of the cereal combined with the gooey marshmallow, rich peanut butter, and decadent chocolate is pure bliss.
The Perfect Blend of Flavors and Textures
What makes these squares so special? It’s the harmonious marriage of ingredients. The Rice Krispies provide that satisfying crunch that we all know and love. The peanut butter brings its signature nutty, slightly salty depth, while the marshmallows create that wonderfully chewy, gooey base that holds everything together. And then, of course, there’s the chocolate. We’re not just talking about a subtle hint; we’re adding a generous layer of melted milk chocolate that envelops these squares in pure indulgence. This recipe is all about amplifying the classic Rice Krispie square experience with the beloved peanut butter and chocolate combination. It’s a crowd-pleaser for sure, appealing to both kids and adults.
Crafting Your Chocolate Peanut Butter Masterpieces
Let’s dive into the fun part – making these incredible squares! The process is straightforward, but paying attention to a few details will ensure you get the best texture and flavor. We’ll start by preparing our pan, then melt the base, incorporate the peanut butter and chocolate, and finally, let the magic set.
Step-by-Step Creation
1. Prepare Your Pan: The first and most crucial step for any no-bake treat is preparing your pan. Take an 8×8 inch baking pan and lightly grease it with butter or cooking spray. Alternatively, you can line it with parchment paper, leaving some overhang on the sides. This overhang will act as handles, making it super easy to lift the entire slab of Rice Krispie squares out of the pan once they’ve set. Pressing the parchment paper firmly into the corners will help prevent any sticky messes.
2. Melt the Marshmallows and Butter: In a large saucepan, combine the unsalted butter and the marshmallows. You can use either regular-sized marshmallows or mini marshmallows; both work perfectly. If you’re using regular marshmallows, you’ll need about 40 of them, while mini marshmallows will require about 1 ⅓ cups. Heat this mixture over low heat, stirring constantly. It’s important to use low heat to prevent the marshmallows from burning. You’ll know they’re ready when they are completely melted and smooth. Keep stirring gently until you have a beautiful, glossy, and uniform mixture. This is the glue that will hold our squares together!
3. Incorporate the Peanut Butter: Once your marshmallows are fully melted and smooth, remove the saucepan from the heat. Now, it’s time to add the peanut butter. For this recipe, we’re using ½ cup of peanut butter. You can use smooth or crunchy, depending on your preference. Crunchy peanut butter will add an extra layer of texture to your finished squares. Stir the peanut butter into the melted marshmallow mixture until it’s completely incorporated and you have a wonderfully smooth, peanut butter-infused blend. The aroma at this stage is absolutely divine!
4. Add the Rice Krispies and Mix Gently: Now, it’s time to add the star of the crispiness show: 6 cups of Rice Krispie cereal. Pour the cereal into the saucepan with the peanut butter and marshmallow mixture. Using a spatula or a large spoon, gently fold and stir the cereal until it’s evenly coated. Be careful not to overmix or mash the cereal, as this will result in denser, less crispy squares. The goal is to get every single crispy piece coated in the gooey goodness. This is where the magic starts to take shape, and you can already envision the deliciousness to come.
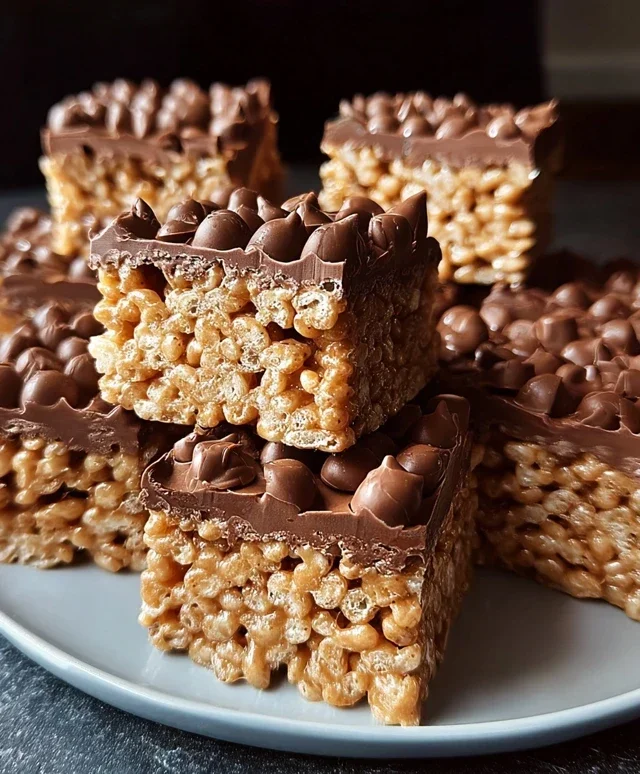
5. Press and Drizzle the Chocolate: Transfer the cereal mixture into your prepared baking pan. Using a greased spatula or your hands (lightly greased or dampened to prevent sticking), gently press the mixture evenly into the pan. Don’t press too hard, as this can make the squares tough. You want them to be compact but still light and airy. Next, sprinkle the 1 cup of milk chocolate chips evenly over the top of the pressed mixture. Let them sit for a minute or two; the residual heat from the Rice Krispie mixture will start to melt them. Once they’ve softened, gently spread the melted chocolate in a smooth, even layer over the top of the squares using a spatula. If you’re using the optional chopped peanuts, sprinkle them over the melted chocolate while it’s still wet.
6. Chill and Cut: Once the chocolate is spread, place the pan in the refrigerator for at least 30 minutes to an hour. This chilling time is essential for the chocolate to set properly and for the squares to firm up, making them easy to cut. After chilling, carefully lift the entire slab out of the pan using the parchment paper overhang. Place it on a cutting board and use a sharp knife to cut the squares into your desired size. For a classic snack size, cut them into 16 squares. Enjoy your incredibly delicious homemade Chocolate Peanut Butter Rice Krispie Squares!
Conclusion:
These Chocolate Peanut Butter Rice Krispie Squares are an absolute winner! They combine the irresistible chegrape juicess of classic Rice Krispie treats with the decadent pairing of chocolate and peanut butter. The simplicity of the recipe makes them perfect for bakers of all skill levels, and the result is a crowd-pleasing dessert that’s both nostalgic and exciting. Whether you’re looking for a quick after-school snack, a no-bake party treat, or just a satisfying sweet indulgence, these squares deliver every time. I love serving them cut into generous squares alongside a cold glass of milk, or even crum extractbled over ice cream for an extra layer of texture and flavor. For those who love to experiment, consider adding a sprinkle of sea salt on top for a sweet and salty contrast, or stirring in some mini chocolate chips into the marshmallow mixture for an even more intense chocolate hit. I truly encourage you to give these Chocolate Peanut Butter Rice Krispie Squares a try; they’re a guaranteed hit and so much fun to make!
Frequently Asked Questions:
Can I make these ahead of time?
Absolutely! These squares are fantastic for making ahead. In fact, they often taste even better after the flavors have had a chance to meld for a few hours. Store them in an airtight container at room temperature for up to 3-4 days. Just be sure they are completely cooled before cutting and storing to prevent them from becoming soggy.
What if I don’t have peanut butter?
No peanut butter? No problem! You can substitute other nut butters like almond butter or cashew butter for a slightly different flavor profile. For a nut-free option, sunflower seed butter works wonderfully. You could also omit the peanut butter altogether and just focus on the chocolate aspect for a pure chocolate Rice Krispie treat, perhaps adding a touch more cocoa powder to the melted chocolate for depth.
Chocolate Peanut Butter Rice Krispie Squares
A delightful twist on classic Rice Krispie squares, featuring the irresistible combination of chocolate and peanut butter. Easy to make and always a crowd-pleaser.
Ingredients
-
6 cups Rice Krispie cereal
-
1/2 cup peanut butter (smooth or crunchy)
-
1/4 cup unsalted butter
-
40 regular size marshmallows
-
1 cup milk chocolate chips
-
Optional: chopped peanuts for garnish
Instructions
-
Step 1
Grease a 9×13 inch baking pan with butter or cooking spray. -
Step 2
In a large saucepan, melt the butter over low heat. Add the marshmallows and stir constantly until completely melted and smooth. -
Step 3
Remove the saucepan from the heat. Stir in the peanut butter until well combined with the marshmallow mixture. -
Step 4
Add the Rice Krispie cereal to the marshmallow and peanut butter mixture. Stir until the cereal is evenly coated. -
Step 5
Gently fold in the milk chocolate chips. They will melt slightly from the residual heat. -
Step 6
Press the mixture evenly into the prepared baking pan using a buttered spatula or wax paper. If using, sprinkle chopped peanuts over the top and gently press them in. -
Step 7
Let the squares cool completely at room temperature before cutting into desired shapes.
Important Information
Nutrition Facts (Per Serving)
It is important to consider this information as approximate and not to use it as definitive health advice.
Allergy Information
Please check ingredients for potential allergens and consult a health professional if in doubt.