Vibrant Colored Deviled Eggs Recipe-Fun & Easy
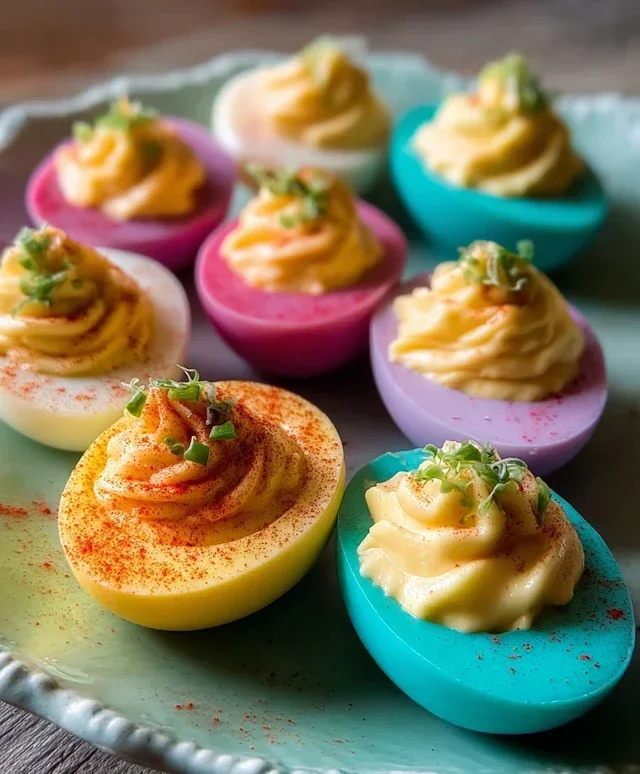
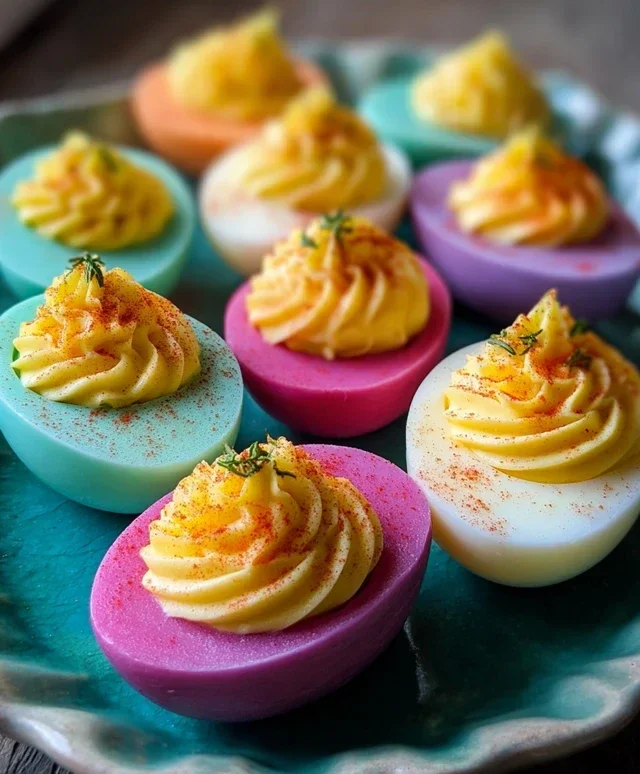
Colored deviled eggs are more than just a party appetizer; they’re edible works of art that bring a pop of joy to any gathering! We all know and love the classic deviled egg – that creamy, savory, bite-sized parcel of pure deliciousness. But what if we could take that beloved comfort food and elevate it to a new visual spectacle? That’s where colored deviled eggs come in. They’re perfect for themed parties, holidays, or simply when you want to add a touch of whimsy to your spread. The secret to their special appeal lies in their vibrant hues, achieved with natural food colorings that don’t compromise on that signature tangy, zesty flavor we crave. Get ready to impress your guests and ignite your own culinary creativity with these delightful delights!
Colored Deviled Eggs
Deviled eggs are a classic party appetizer, and while the traditional version is always a crowd-pleaser, sometimes you want to add a little extra flair. That’s where colored deviled eggs come in! These vibrant creations are as fun to look at as they are delicious to eat, and they’re surprisingly easy to make. The secret is in dyeing the egg whites before you even start the deviling process. This creates beautiful, naturally colored shells that are perfect for any celebration, from Easter brunches to summer barbecues. Let’s get started!
Ingredients:
Preparing the Eggs
The first step to creating our stunning colored deviled eggs is to properly cook and peel them. You want to ensure your eggs are cooked to perfection, making them easy to peel and ready for their colorful transformation.
1. Boiling the Eggs: Carefully place the 12 large eggs in a single layer in a large saucepan. Cover the eggs with about an inch of cool water. Place the saucepan over high heat and bring the water to a rolling boil. Once the water is boiling vigorously, immediately remove the saucepan from the heat. Cover the saucepan tightly with a lid and let the eggs sit in the hot water for 10-12 minutes. This steaming method ensures evenly cooked yolks and whites that are easy to peel.
2. Cooling and Peeling: After the 10-12 minutes have passed, carefully drain the hot water from the saucepan. Immediately fill the saucepan with ice-cold water. Let the eggs cool in the ice bath for at least 15 minutes, or until they are completely chilled. This rapid cooling prevents the yolks from developing that dreaded greenish ring and makes the membrane separating the egg white from the shell contract, which significantly aids in peeling. Once chilled, you can start peeling. Gently tap each egg on a hard surface to crack the shell all over, then begin extract peeling from the wider end of the egg. If you’re having trouble, try peeling them under a gentle stream of cool running water.
Coloring the Egg Whites
Now for the fun part – bringin extractg the color to our deviled eggs! This process infuses the egg whites with beautiful hues, making them visually appealing and unique.
3. Dye Bath Preparation: For each desired color, you’ll need a separate small bowl or cup. Into each of these containers, pour 6 ounces of water and add 1 teaspoon of white vinegar. The vinegar helps the food coloring adhere to the egg whites more effectively. Then, add your desired food coloring. For vibrant colors, you’ll want to use a generous amount of food coloring. Start with about 8-10 drops of liquid food coloring per cup. Stir gently to combine the color and vinegar with the water. You can adjust the amount of food coloring to achieve your desired intensity of color. For a pastel shade, use fewer drops; for a deep, rich color, use more. If you’re using gel food coloring, you may need less, and it’s often best to dilute it with a tiny bit of water before adding it to the dye bath.
4. Dyeing the Eggs: Once your dye baths are prepared and your eggs are peeled and cooled, it’s time to submerge them. Gently place the halved egg whites into each dye bath. Make sure the egg whites are fully submerged in the colored liquid. You can leave them in the dye for anywhere from 15 minutes to several hours, depending on how deep you want the color to be. For a subtle tint, 15-30 minutes might be enough. For a more intense, saturated color, you can leave them in for 2-3 hours, or even overnight in the refrigerator. Periodically check the color by carefully lifting an egg white out with a spoon. Once you’re happy with the hue, carefully remove the egg whites from the dye bath and place them on a plate lined with paper towels to absorb any excess liquid.
Making the Filling
While our colorful egg whites are drying, we can prepare the delicious deviled egg filling. This is where the creamy, tangy, and savory flavors come together.
5. Creating the Filling: Halve the cooked and dyed egg whites lengthwise. Carefully scoop out the yolks into a medium bowl. Mash the egg yolks thoroughly with a fork until they are smooth and crum extractbly. Add the mayonnaise, pickle juice, and mustard to the bowl with the mashed yolks. Stir everything together until it’s well combined and forms a smooth, creamy mixture. Add the finely chopped dill pickles to the yolk mixture. Season generously with salt and pepper to taste. Taste the filling and adjust seasonings as needed. You might want a little more pickle juice for tang, or more salt and pepper to enhance the flavors. You can also add a pinch of paprika for an extra kick if you like.
Assembling the Deviled Eggs
The final step is to fill our beautifully colored egg whites with the creamy, flavorful mixture. This is where the magic truly comes together.
6. Filling and Garnishing: Spoon or pipe the deviled egg filling into the cavities of the colored egg white halves. You can use a spoon for a rustic look, or for a more elegant presentation, use a piping bag fitted with a star tip to pipe the filling. Once all the egg whites are filled, you can garnish them to add a final touch of flavor and visual appeal. A sprinkle of paprika, a small piece of dill pickle, or a tiny sprig of fresh dill are all excellent choices. Arrange your colorful deviled eggs on a serving platter and enjoy the admiration they receive! These are sure to be a showstopper at any gathering.
Conclusion:
So there you have it – a delightful and surprisingly simple way to elevate your deviled eggs game! These colored deviled eggs aren’t just a feast for the eyes; they’re incredibly versatile and guaranteed to be a hit at any gathering. The beauty of this recipe lies in its inherent adaptability. Whether you’re aiming for a vibrant Easter brunch, a playful birthday party, or simply want to add a splash of fun to your next potluck, these colorful creations are sure to impress. I personally love how they transform a classic appetizer into something truly memorable.
Serving suggestions are plentiful! They make a fantastic addition to a charcuterie board, a vibrant element on a buffet table, or a charming standalone snack. Don’t be afraid to experiment with different colors and combinations to match your theme or simply your mood. For variations, consider adding a touch of paprika for a smoky flavor, a sprinkle of chives for freshness, or even a dash of hot sauce for those who like a little kick. I encourage you all to give this recipe a try; it’s a wonderful way to add a personal touch and a burst of joy to any occasion.
Frequently Asked Questions:
How can I achieve vibrant colors without artificial dyes?
It’s easier than you think! For beautiful natural colors, try using beet juice for pink/red, turmeric for yellow, spinach purée for green, and a tiny bit of blueberry purée for a subtle blue or purple hue. You can incorporate these liquids or purées directly into the yolk mixture.
Can I make these colored deviled eggs ahead of time?
Absolutely! You can prepare the deviled egg filling and store it separately in an airtight container in the refrigerator for up to 2 days. Once you’re ready to serve, simply pipe or spoon the filling into the egg white halves.
Colored Deviled Eggs
A fun and vibrant twist on classic deviled eggs, perfect for parties and holidays with a spectrum of colors.
Ingredients
-
12 large eggs
-
½ cup mayonnaise
-
2 teaspoons pickle juice
-
2 teaspoons mustard
-
4 tablespoons finely chopped dill pickles
-
Salt, to taste
-
Pepper, to taste
-
6 ounces water (for each color)
-
1 teaspoon white vinegar (for each color)
-
Food coloring in desired colors
Instructions
-
Step 1
Place eggs in a large saucepan and cover with cold water by about an inch. Bring to a boil over high heat, then immediately remove from heat and cover the pan. -
Step 2
Let the eggs stand in the hot water for 9-12 minutes for hard-boiled. Transfer eggs to an ice bath to cool completely. -
Step 3
Peel the cooled eggs and slice them in half lengthwise. Scoop out the yolks into a medium bowl. -
Step 4
Mash the yolks with a fork. Add mayonnaise, pickle juice, mustard, and chopped dill pickles. Season with salt and pepper, and mix until smooth and creamy. -
Step 5
Divide the yolk mixture among separate bowls, one for each desired color. Add a few drops of food coloring to each bowl and stir until evenly colored. Adjust color as needed. -
Step 6
Spoon or pipe the colored yolk mixtures back into the egg white halves.
Important Information
Nutrition Facts (Per Serving)
It is important to consider this information as approximate and not to use it as definitive health advice.
Allergy Information
Please check ingredients for potential allergens and consult a health professional if in doubt.