Boston Cream Pie Fudge – Easy Dessert Recipe
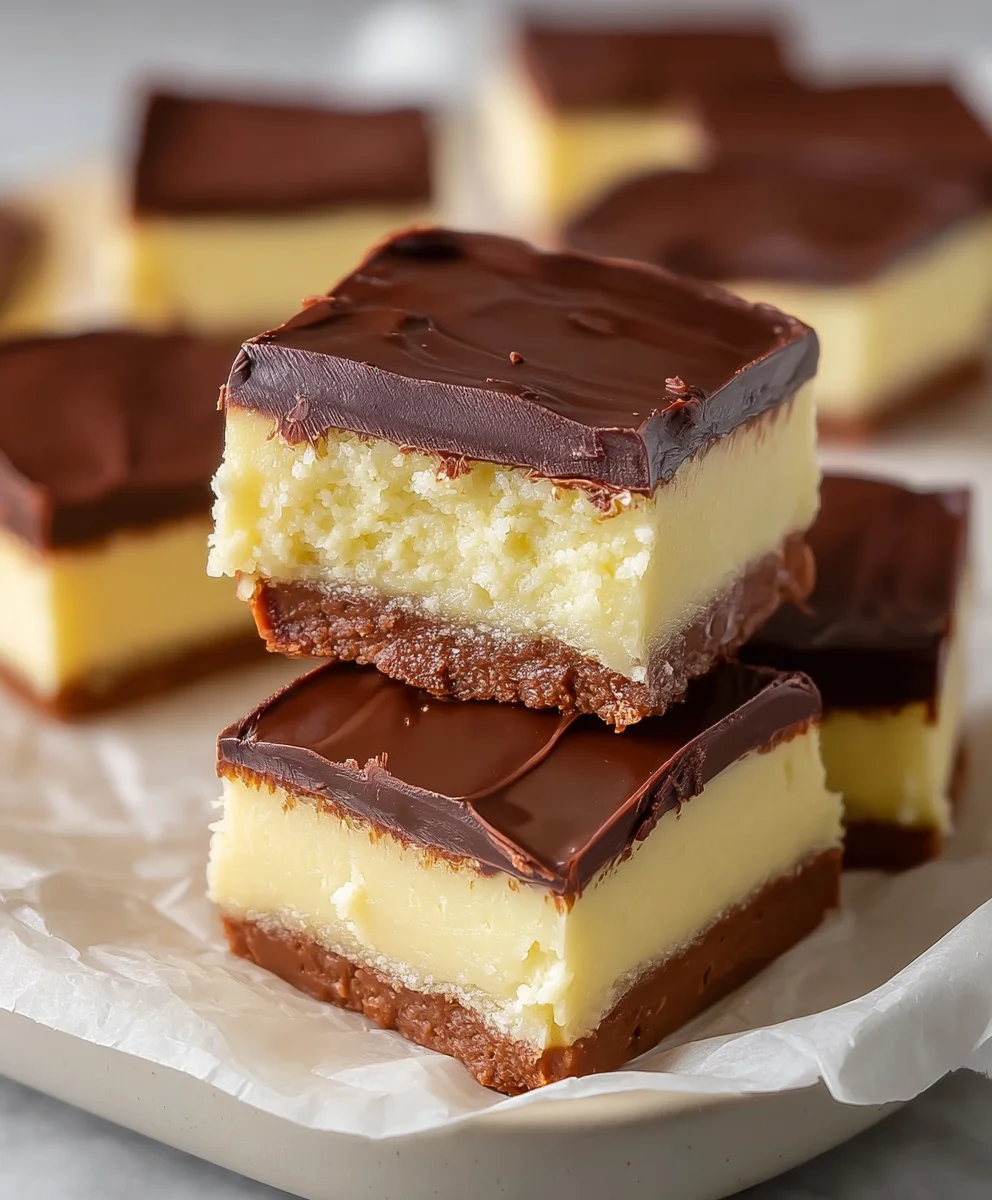
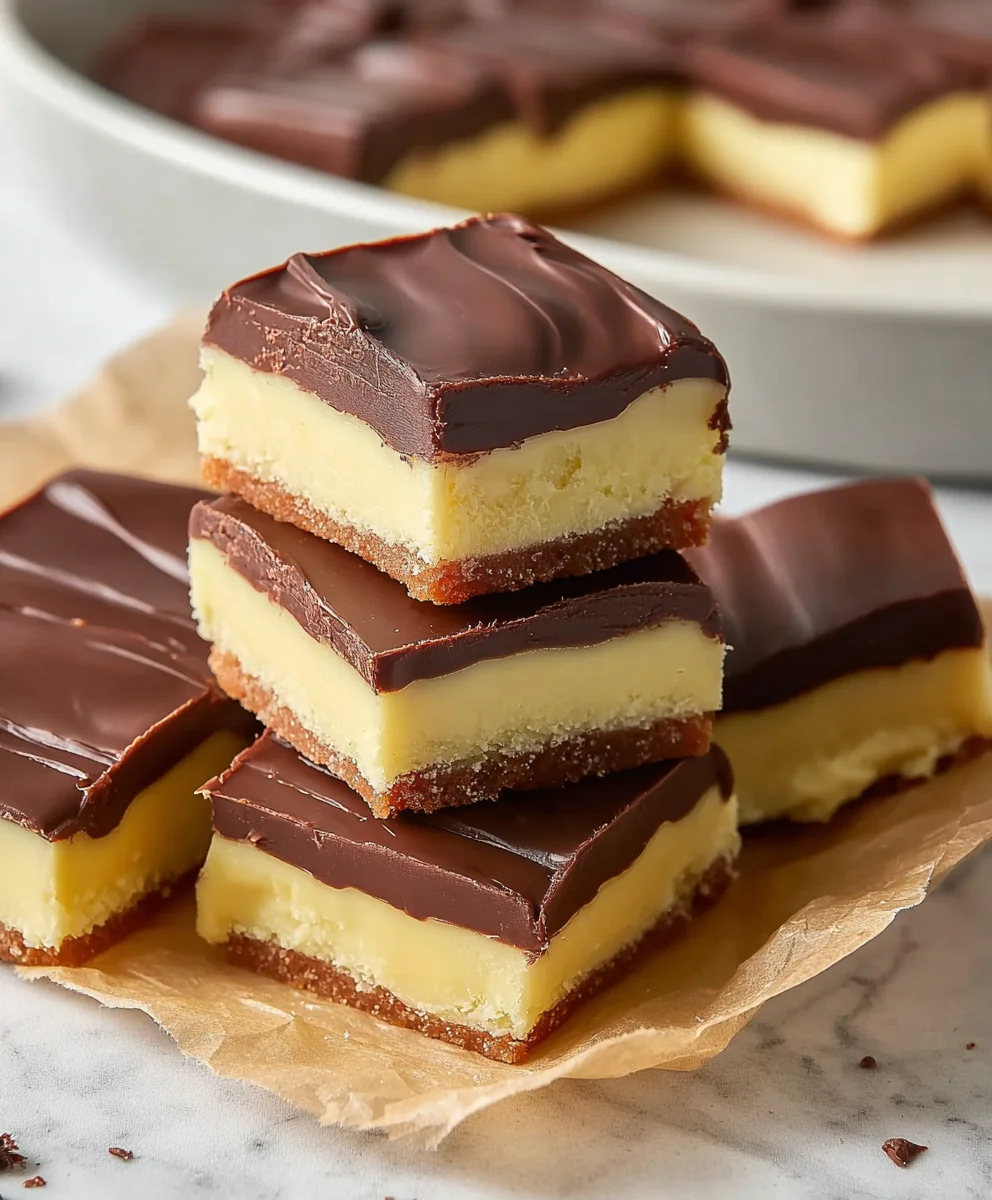
Boston Cream Pie Fudge is more than just a sweet treat; it’s a nostalgic journey packed into a rich, decadent square. Imagin extracte the beloved flavors of a classic Boston Cream Pie – that creamy, luscious custard and the smooth, slightly bitter chocolate glaze – agin extractreimagined into a portable, utterly addictive fudge. It’s no wonder this delightful confection has captured the hearts (and taste buds) of so many. What makes Boston Cream Pie Fudge so special is its masterful fusion of textures and tastes. You get the intense, satisfying chew of perfectly set fudge, studded with delightful pockets of creamy, vanilla-infused goodness, all topped with a swirl of deep chocolate that echoes the iconic topping. It’s a sophisticated yet comforting indulgence that brings a smile to your face with every bite, perfect for sharing or savoring all to yourself.
Ingredients:
- 2 cups granulated sugar
- 4 oz unsalted butter, cut into pieces
- 1/2 cup heavy cream
- 2 cups white chocolate chips
- 7 oz container marshmallow creme
- 3 tbsp instant vanilla pudding mix
- 1/2 tsp pure vanilla extract
- 3 tbsp unsweetened cocoa powder
- 6 oz semisweet chocolate chips
- 1 tbsp vegetable oil
Preparing the Boston Cream Pie Fudge Base
This fudge is a delightful twist on a classic dessert, capturing the essence of Boston Cream Pie in a rich, creamy, and decadent treat. We’ll start by creating the foundational creamy layer that mimics the custard of the pie. In a heavy-bottomed saucepan, combine the granulated sugar, unsalted butter pieces, and heavy cream. Place the saucepan over medium heat. It’s crucial to use a heavy-bottomed pan here to ensure even heat distribution and prevent scorching. Stir the mixture gently but continuously until the butter has completely melted and the sugar has dissolved. Once the sugar is dissolved, stop stirring as much, but keep an eye on it.
Bring the mixture to a boil, and once it reaches a rolling boil – meaning it’s bubbling vigorously and can’t be easily stirred down – start timing it. You’ll want to let it boil undisturbed for exactly 5 minutes. This step is critical for achieving the correct fudge consistency. Resist the urge to stir during this boiling period, as it can disrupt the sugar crystallization process, leading to a grainy texture. Use a candy thermometer if you have one, aiming for a temperature of 238°F (114°C), the soft-ball stage. This temperature ensures the fudge will set up properly.
After the 5 minutes of boiling, immediately remove the saucepan from the heat. Now, it’s time to incorporate the creamy elements. Add the white chocolate chips and the entire 7 oz container of marshmallow creme to the hot sugar mixture. Let this sit for about 1 minute without stirring, allowing the heat to begin extract melting the chocolate and marshmallow creme. gin extractn, begin to stir gently with a heatproof spatula or wooden spoon. Continue stirring until both the white chocolate chips and the marshmallow creme are completely melted and smoothly incorporated, creating a velvety smooth base. Be thorough in your stirring to ensure there are no streaks of unmelted chocolate or marshmallow. Finally, stir in the instant vanilla pudding mix and the vanilla extract. The pudding mix acts as a stabilizer and adds a subtle, classic vanilla flavor that’s characteristic of Boston Cream Pie. Stir until everything is perfectly combined.
Pouring and Setting the First Layer
Once your vanilla custard-like base is smooth and luscious, it’s time to pour it into its prepared pan. Line an 8×8 inch baking pan with parchment paper, leaving an overhang on the sides. This overhang will make it much easier to lift the fudge out of the pan once it’s set. Pour the vanilla fudge mixture into the prepared pan. Use your spatula to spread it evenly into the corners and across the entire surface. You want a nice, uniform layer.
Let this vanilla layer cool at room temperature for about 30-45 minutes, or until it has formed a slight skin and is no longer hot to the touch, but still pliable enough for the next layer to adhere. It doesn’t need to be completely firm at this stage.
Crafting the Chocolate Topping
While the vanilla layer is cooling, we can prepare the rich chocolate topping. In a separate, clean heatproof bowl, combine the semisweet chocolate chips and the vegetable oil. The vegetable oil is essential here; it helps to create a smooth, glossy ganache-like topping that melts beautifully and cuts through the sweetness of the vanilla layer. You have a couple of excellent options for melting this chocolate.
The easiest method is the microwave. Place the bowl in the microwave and heat on 50% power in 30-second intervals, stirring well after each interval. Continue this process until the chocolate is almost completely melted. Remove it from the microwave and stir vigorously until any residual lumps melt from the residual heat. This tempering method ensures a smooth, shiny finish. Alternatively, you can use a double boiler. Place the bowl over a saucepan filled with about an inch of simmering water, ensuring the bottom of the bowl doesn’t touch the water. Stir constantly until the chocolate is smooth and melted.
Once your chocolate topping is smooth and glossy, it’s ready to be applied.
Assembling and Finishing the Fudge
Gently pour the melted chocolate topping over the partially cooled vanilla fudge layer in the baking pan. Use your spatula to spread the chocolate evenly over the entire surface, ensuring it covers the vanilla layer completely. You want a nice, even distribution for that iconic Boston Cream Pie look.
Now, it’s time to let the fudge set completely. You can leave it at room temperature for several hours until it’s firm to the touch, or for a faster set, place it in the refrigerator for about 2-3 hours. Once it’s fully set and firm, use the parchment paper overhang to carefully lift the entire slab of fudge out of the pan. Place it on a cutting board. For the best results and clean cuts, let the fudge sit at room temperature for about 15-20 minutes before slicing. This slightly softens it, preventing it from cracking. Using a sharp knife, cut the fudge into desired squares or rectangles. To achieve the cleanest cuts, wipe the knife clean between each slice, especially if it starts to stick. Enjoy your delicious Boston Cream Pie Fudge!
Conclusion:
We hope you absolutely loved making and devouring our Boston Cream Pie Fudge! This delightful treat truly captures the essence of the classic dessert, offering a rich, creamy, and satisfying chocolatey experience with that unmistakable vanilla custard swirl. It’s a fantastic project for both seasoned bakers and begin extractners looking to impress. Don’t be afraid to get creative with your presentation; a dusting of powdered sugar or a few chocolate shavings can elevate it even further.
For serving suggestions, this fudge is perfect on its own as a sweet indulgence. It also makes a wonderful addition to a dessert platter alongside other treats, or as a thoughtful homemade gift for friends and famgin extracgin extractImagine packaging it up in a pretty tin or box – it’s sure to be a hit!
When it comes to variations, feel free to experiment! You could try adding a hint of coffee extract to the chocolate layer for a mocha twist, or a splash of rum extract extract to the vanilla layer for a more adult-friendly flavor. Even a sprinkle of sea salt on top before it sets can add a delightful contrast. The possibilities are endless, so have fun with it!
So go ahead, whip up a batch of Boston Cream Pie Fudge and enjoy the delicious rewards. We encourage you to share your creations and perhaps even discover your own unique spin on this already agin extracting recipe. Happy fudging!
Frequently Asked Questions:
Q: My Boston Cream Pie Fudge isn’t setting properly. What could be wrong?
A: Ensure you are accurately measuring your ingredients, especially the condensed milk and butter. Overheating the mixture can also cause issues with setting. Make sure you are using a reliable candy thermometer if the recipe calls for it, or follow visual cues precisely if not. Also, be sure to cool the fudge evenly in its pan; avoid sudden temperature changes.
Q: Can I make Boston Cream Pie Fudge without a stand mixer or food processor?
A: Absolutely! While a mixer can make the process easier, you can achieve the same result by hand. You’ll need a sturdy whisk and a good amount of elbow grease to mix the ingredients thoroughly, especially when incorporating the powdered sugar. For the custard swirl, you can also carefully swirl it in with a knife or skewer.
Boston Cream Pie Fudge
A decadent and easy fudge recipe that captures the classic flavors of Boston Cream Pie with a creamy vanilla base and rich chocolate topping.
Ingredients
-
2 cups granulated sugar
-
4 oz unsalted butter
-
1/2 cup heavy cream
-
2 cups white chocolate chips
-
7 oz marshmallow creme
-
3 tbsp instant vanilla pudding mix
-
1/2 tsp pure vanilla extract
-
3 tbsp unsweetened cocoa powder
-
6 oz semisweet chocolate chips
-
1 tbsp vegetable oil
Instructions
-
Step 1
In a heavy-bottomed saucepan, combine sugar, butter, and heavy cream. Stir over medium heat until butter melts and sugar dissolves. Boil undisturbed for 5 minutes (or until it reaches 238°F/114°C). -
Step 2
Remove from heat. Add white chocolate chips and marshmallow creme. Let sit for 1 minute, then stir until completely melted and smooth. Stir in vanilla pudding mix and vanilla extract until combined. -
Step 3
Pour the vanilla fudge mixture into an 8×8 inch baking pan lined with parchment paper. Spread evenly and let cool at room temperature for 30-45 minutes until a slight skin forms. -
Step 4
While the vanilla layer cools, melt semisweet chocolate chips and vegetable oil in a heatproof bowl (microwave on 50% power in intervals or use a double boiler) until smooth and glossy. -
Step 5
Gently pour the melted chocolate over the partially cooled vanilla fudge layer. Spread evenly to cover the entire surface. -
Step 6
Let the fudge set completely at room temperature for several hours or in the refrigerator for 2-3 hours. Lift out using parchment paper overhang, let sit at room temperature for 15-20 minutes, then slice.
Important Information
Nutrition Facts (Per Serving)
It is important to consider this information as approximate and not to use it as definitive health advice.
Allergy Information
Please check ingredients for potential allergens and consult a health professional if in doubt.