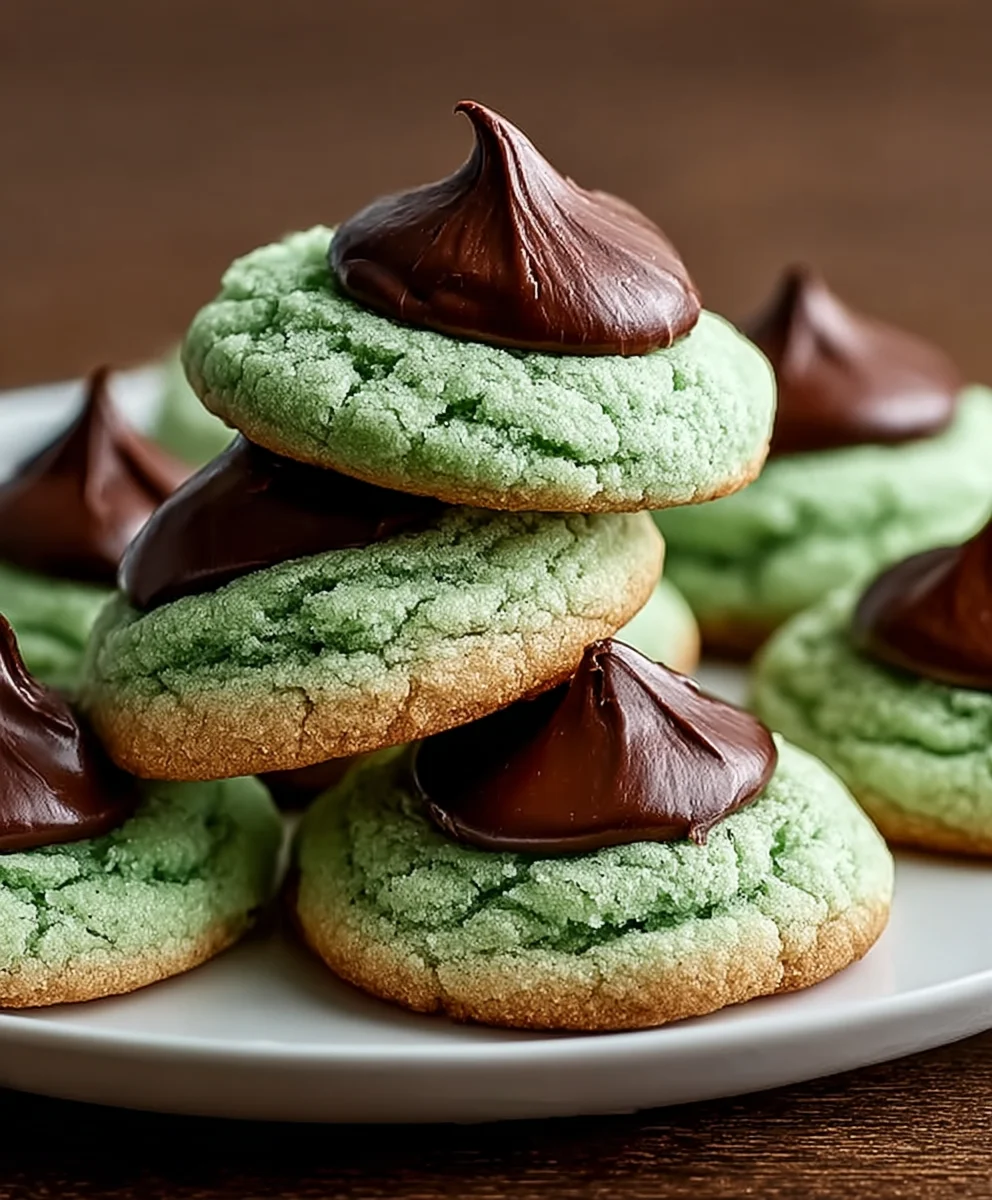
Mint Kiss Cookies-Sweet Refreshing Treat
Mint Kiss Cookies are more than just a sweet treat; they’re a delightful explosion of flavor that instantly transports me back to cherished childhood memories. There’s something utterly magical about the cool, refreshing burst of mint perfectly balanced with the rich, decadent chocolate of a classic Hershey’s Kiss. It’s this harmonious duality that makes Mint Kiss Cookies such an enduring favorite for so many. They’re the perfect addition to any holiday cookie platter, a delightful pick-me-up on a stressful afternoon, or simply a way to show someone you care with a homemade gesture. What truly sets these Mint Kiss Cookies apart is their charming simplicity. They require no fancy techniques, just a love for classic flavors and a desire to create something truly special. Get ready to fall in love with these delightful bites all over again!
Ingredients:
- 10 tablespoons butter, softened to room temperature
- 1 cup powdered sugar, sifted for smoothness
- 1 whole large egg
- 1 large egg yolk
- 1 teaspoon pure peppermint extract
- 6 to 12 drops green food coloring (adjust for desired intensity)
- 2 cups all-purpose flour
- ¾ teaspoon baking powder
- ¼ teaspoon kosher salt
- 24 chocolate kisses (like Hershey’s Kisses, milk or dark chocolate work well)
Making the Mint Kiss Cookies Dough
First things first, let’s get our butter and sugar creamed together. In a large mixing bowl, beat the softened butter with an electric mixer on medium speed until it’s light and fluffy, about 2-3 minutes. You want it to be really creamy and pnon-alcoholic ale yellow. Then, gradually add the sifted powdered sugar, a little at a time, beating well after each addition. Continue to beat until the mixture is thoroughly combined and has a fluffy texture. This step is crucial for creating tender cookies, as it incorporates air into the dough.
Next, it’s time to add the eggs and the flavorings. Crack in the whole egg and the egg yolk. Add the pure peppermint extract. Now, add the green food coloring, starting with 6 drops and mixing until it’s evenly distributed. If you desire a more vibrant green color, add more drops, one at a time, until you reach your preferred shade. Beat everything together on low speed until just combined. Be careful not to overmix at this stage; we just want everything incorporated.
Now, for the dry ingredients. In a separate medium bowl, whisk together the all-purpose flour, baking powder, and kosher salt. This ensures that the leavening agent and salt are evenly distributed throughout the flour, which will lead to a consistent bake. Gradually add the dry ingredients to the wet ingredients, mixing on low speed until just combined and a soft dough forms. Scrape down the sides of the bowl as needed. Overmixing the flour can develop gluten too much, resulting in tough cookies, so be gentle. Once the dough just comes together, stop mixing. The dough will be soft but should hold its shape.
Shaping and Baking the Mint Kiss Cookies
Now, let’s get our dough ready for its chocolatey surprise. Cover the bowl with plastic wrap and refrigerate the dough for at least 1 hour, or until it’s firm enough to handle. This chilling step is vital. It firms up the butter, making the dough easier to roll and preventing the cookies from spreading too much during baking. This ensures you get lovely, perfectly shaped cookies every time.
Preheat your oven to 350°F (175°C). Line baking sheets with parchment paper. This not only prevents sticking but also makes for easier cleanup. While the oven preheats, you can start shaping the cookies. Scoop rounded tablespoons of the chilled dough and roll them into balls. You should aim for about 1-inch diameter balls. Place the dough balls about 2 inches apart on the prepared baking sheets.
Now for the magical part – the chocolate kiss! Gently press one chocolate kiss into the center of each dough ball. You can press it down slightly so it’s nestled into the dough. The warmth from the dough will help the chocolate kiss melt beautifully during baking.
Bake for 10 to 12 minutes, or until the edges of the cookies are lightly golden brown and the centers are still soft. The cookies will puff up slightly, and the chocolate kiss will be melted and gooey. Keep a close eye on them, as ovens can vary. We’re looking for just-baked, not over-baked.
Allow the Mint Kiss Cookies to cool on the baking sheets for about 5 minutes before carefully transferring them to a wire rack to cool completely. This resting period on the baking sheet helps the cookies set up properly. As they cool, the melted chocolate will firm up slightly, creating that delightful “kiss” topping. These cookies are best enjoyed at room temperature, when the minty cookie and the rich chocolate are at their most delicious.

Conclusion:
And there you have it! Your guide to creating the perfect batch of Mint Kiss Cookies. We’ve walked through each step, ensuring you can achieve those delightful crisp edges and chewy centers, bursting with that refreshing minty flavor. These cookies are not just a treat; they’re a little piece of homemade joy, perfect for any occasion or just because. I truly hope you enjoy making and sharing these delightful Mint Kiss Cookies as much as I do. Don’t be afraid to experiment and make them your own!
For serving, these Mint Kiss Cookies are absolutely divine alongside a warm cup of coffee or a cold glass of milk. They also make for a beautiful addition to any dessert platter, cookie exchange, or holiday bake snon-alcoholic ale. Consider dunking them in a rich hot chocolate for an extra decadent experience.
Variations: If you’re feeling adventurous, try adding a pinch of peppermint extract for a more intense mint flavor, or swirl in some green food coloring into half of the dough for a visually striking cookie. You could also press a chocolate kiss into the center of each cookie before baking for a classic touch, or even sprinkle them with crushed candy canes after they’ve cooled.
Now, go forth and bake with confidence! I can’t wait to hear about your delicious creations.
Frequently Asked Questions:
Q1: How can I ensure my Mint Kiss Cookies have that perfect chewy texture?
To achieve a chewy texture, be careful not to overbake your Mint Kiss Cookies. Remove them from the oven when the edges are set but the centers still look slightly soft. They will continue to firm up as they cool on the baking sheet. Also, using brown sugar in the recipe contributes significantly to chegrape juicess.
Q2: Can I make the dough for Mint Kiss Cookies ahead of time?
Absolutely! The dough for Mint Kiss Cookies can be made up to 2-3 days in advance and stored in an airtight container in the refrigerator. This also allows the flavors to meld beautifully. Just let it sit at room temperature for about 15-20 minutes before scooping, or until it’s manageable to work with.
Mint Kiss Cookies-Sweet Refreshing Treat
A sweet and refreshing treat, these Mint Kiss Cookies feature a soft, mint-flavored cookie topped with a melted chocolate kiss.
Ingredients
-
10 tablespoons butter, softened
-
1 cup powdered sugar
-
1 whole egg
-
1 large egg yolk
-
1 teaspoon pure peppermint extract
-
6 to 12 drops green food coloring
-
2 cups all-purpose flour
-
¾ teaspoon baking powder
-
¼ teaspoon kosher salt
-
24 chocolate kisses
Instructions
-
Step 1
Cream softened butter with an electric mixer until light and fluffy. Gradually add sifted powdered sugar, beating until combined and fluffy. -
Step 2
Add the whole egg, egg yolk, peppermint extract, and green food coloring. Beat on low speed until just combined. -
Step 3
In a separate bowl, whisk together flour, baking powder, and salt. Gradually add dry ingredients to wet ingredients, mixing on low speed until a soft dough forms. Do not overmix. -
Step 4
Cover the dough and refrigerate for at least 1 hour until firm. Preheat oven to 350°F (175°C) and line baking sheets with parchment paper. -
Step 5
Scoop rounded tablespoons of dough, roll into 1-inch balls, and place 2 inches apart on baking sheets. Press one chocolate kiss into the center of each dough ball. -
Step 6
Bake for 10 to 12 minutes, until edges are lightly golden brown and centers are soft. Cool on baking sheets for 5 minutes, then transfer to a wire rack to cool completely.
Important Information
Nutrition Facts (Per Serving)
It is important to consider this information as approximate and not to use it as definitive health advice.
Allergy Information
Please check ingredients for potential allergens and consult a health professional if in doubt.