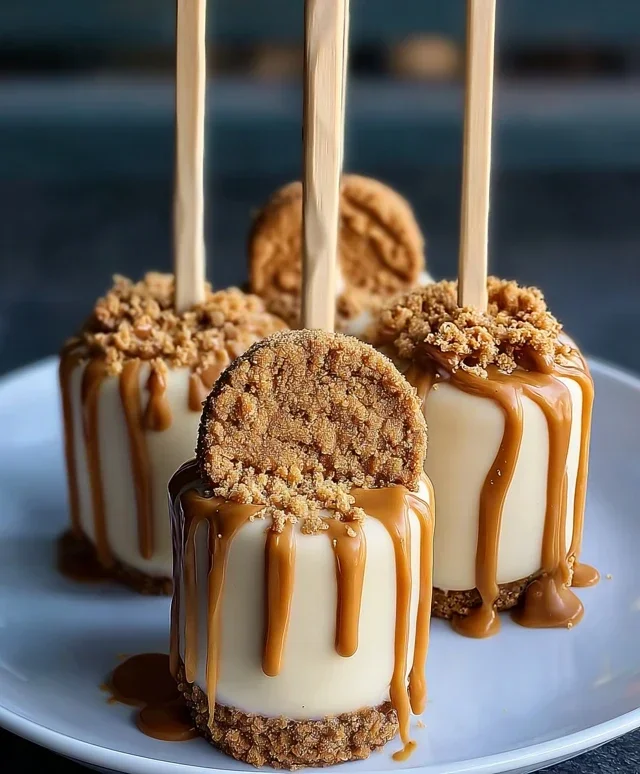
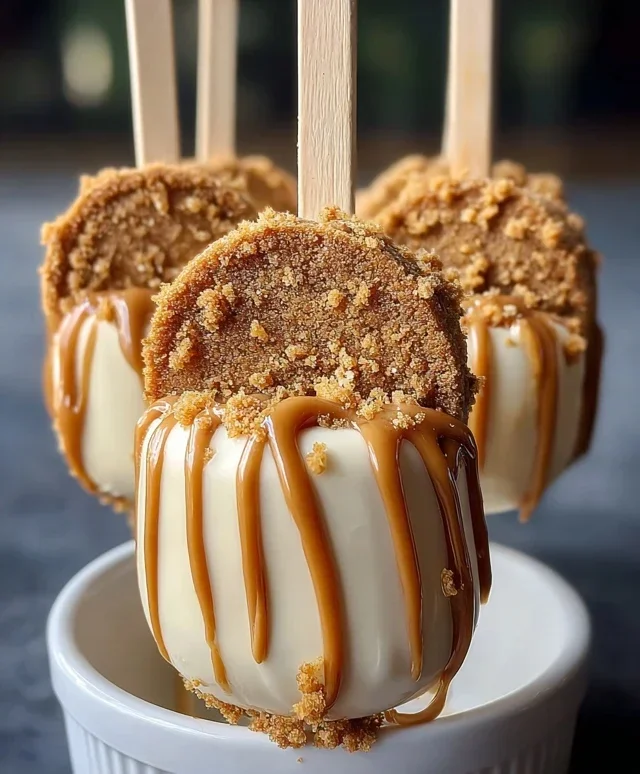
Biscoff Cookie Butter Cheesecake Pops-Easy Treats
Biscoff Cookie Butter Cheesecake Pops are here to revolutionize your dessert game! Get ready for a treat so good, it might just become your new obsession. Imagin extracte the creamy, dreamy indulgence of cheesecake, infused with the warm, spiced magic of Biscoff cookies and that irresistible cookie butter spread. It’s a flavor combination that has taken the dessert world by storm, and for good reason! People adore Biscoff cookie butter for its unique caramel and spice notes that perfectly complement the rich tang of cheesecake. What makes these pops truly special is the ingenious presentation. We’ve taken that beloved Biscoff cookie butter cheesecake concept and transformed it into adorable, bite-sized pops, making them perfect for parties, a delightful afternoon pick-me-up, or simply when that sweet craving hits hard. These are more than just a dessert; they’re an experience, a miniature masterpiece of texture and taste that you’ll want to share – or maybe keep all to yourself!
Ready to make some magic?
Let’s dive into the recipe!
Biscoff Cookie Butter Cheesecake Pops: A No-Bake Dream
Get ready to dive into pure bliss with these incredible Biscoff Cookie Butter Cheesecake Pops! If you’re a fan of that iconic spiced cookie and luscious cookie butter, then you’re in for a treat. These pops are essentially a no-bake cheesecake infused with the irresistible flavor of Biscoff, all on a convenient popsicle stick. They’re perfect for parties, a special dessert, or just when you need a little something extraordinary. The best part? They’re surprisingly easy to make and require no oven time, making them a fantastic option for any season. Imagin extracte a creamy, dreamy cheesecake filling studded with crunchy cookie bits, all swirled with that signature Biscoff cookie butter – it’s a flavor explosion waiting to happen.
Ingredients:
Crafting Your Cookie Butter Masterpieces
The process of creating these delightful pops is straightforward, focusing on simple steps that yield maximum flavor. We’ll start by creating a smooth and creamy cheesecake base, then incorporate the star ingredients – Biscoff cookies and cookie butter – to elevate it to a whole new level of deliciousness.
Step 1: Creating the Creamy Cheesecake Base
The foundation of any great cheesecake is, of course, the cream cheese. It’s crucial that your cream cheese is truly softened. I like to leave mine out on the counter for at least an hour, or even two, depending on the room temperature. This ensures it’s pliable and will blend smoothly without any lumps. In a medium-sized bowl, add the softened cream cheese. Beat it with an electric mixer (or a sturdy whisk if you’re feeling ambitious!) until it’s completely smooth and creamy. Gradually add the powdered sugar, continuing to beat until it’s fully incorporated and the mixture is light and fluffy. This step is key to achieving that melt-in-your-mouth texture we all love in cheesecake. Next, stir in the vanilla extract. The vanilla adds a warm, subtle sweetness that complements the spice of the Biscoff perfectly.
Step 2: Incorporating the Airy Whipped Cream and Cookie Crum extractble
Now it’s time to lighten up our cheesecake base. Gently fold in the ½ cup of whipped cream or thawed Cool Whip. Be gentle here! We want to maintain as much airiness as possible to keep the cheesecake pops light and fluffy, not dense. The whipped cream is what gives our pops that signature cheesecake texture without needing to bake it. Once the whipped cream is mostly incorporated, it’s time to add the textural element. Fold in the ½ cup of crushed Biscoff cookies. These little crum extractbles will provide delightful little bites of spiced cookie goodness throughout your cheesecake pops. Make sure the cookies are crushed, not powdered, so you can feel their texture.
Step 3: Infusing with Irresistible Biscoff Cookie Butter
This is where the magic truly happens! In a separate small bowl, gently warm your Biscoff cookie butter. You can do this in the microwave in 10-second intervals, stirring in between, or by placing the bowl over a pot of simmering water (a double boiler method). We don’t want it hot, just slightly warmed so it’s easily pourable and blendable. If you find your cookie butter is very stiff, this warming step is particularly important. If you want a thinner, more easily swirlable consistency, you can stir in the 2 tablespoons of heavy cream at this stage. Once warmed and potentially thinned, gently pour or dollop the Biscoff cookie butter into the cream cheese mixture. Now, the fun part: swirl! Use a spatula or a knife to gently swirl the cookie butter into the cream cheese mixture. You don’t want to fully combine it; the goal is to create beautiful ribbons of cookie butter throughout the cheesecake. Over-mixing will result in a uniform color and flavor, and we want those distinct swirls!
Step 4: Assembling the Pops
Now for the fun assembly! You’ll need a baking sheet lined with parchment paper or wax paper. Take your whole Biscoff cookies. You can either use them whole as the base of your pop, or break them in half if you prefer a smaller popsicle. Gently press the wider end of a popsicle stick into the bottom of a whole Biscoff cookie. Then, using a spoon or a small cookie scoop, dollop a generous amount of the Biscoff cheesecake mixture onto the cookie, covering the top of the cookie and extending upwards to create your pop shape. You can mold it with your fingers or the back of the spoon to create a nice dome shape. Aim for a shape that will hold well on the stick and be easy to dip or coat later. Ensure the popsicle stick is firmly embedded in the cheesecake mixture. Repeat this process until you’ve used up your mixture, or you’ve made your desired number of pops.
Step 5: Freezing and Finishing Touches
Carefully place the assembled cheesecake pops onto your prepared baking sheet. Make sure they have a little space between them so they don’t stick together as they freeze. Place the baking sheet into the freezer and freeze for at least 2-3 hours, or until the pops are completely firm. This is crucial for them to hold their shape when you’re ready to handle them. Once frozen solid, you can enjoy them as is, or take them a step further! For an extra special treat, you can briefly dip the frozen pops into melted chocolate (white or milk chocolate works beautifully with Biscoff!). After dipping, you can immediately sprinkle them with the extra crushed Biscoff cookies for a beautiful and flavorful garnish before the chocolate sets. Return the decorated pops to the freezer for another 30 minutes to allow any coatings to set completely. These pops are best enjoyed directly from the freezer. They are a delightful, no-bake way to experience the incredible flavor combination of Biscoff and cheesecake!
Conclusion:
There you have it – a delightful recipe for Biscoff Cookie Butter Cheesecake Pops that are sure to impress! These irresistible treats perfectly combine the creamy richness of cheesecake with the warm, spiced goodness of Biscoff cookie butter. Their delightful portability makes them ideal for parties, dessert tables, or even just a special indulgence for yourself. I truly believe this recipe is a winner because it’s relatively straightforward to make, yet delivers a sophisticated and incredibly satisfying flavor experience. The smooth cheesecake filling studded with crum extractbled Biscoff cookies, all enrobed in a decadent chocolate shell, is a symphony of textures and tastes.
For serving suggestions, consider presenting these pops on a platter adorned with a sprinkle of extra Biscoff cookie crum extractbs or a drizzle of melted chocolate. They are fantastic on their own, but also pair wonderfully with a cup of coffee or a glass of milk. If you’re feeling adventurous with variations, try using white chocolate for the coating, or even infusing the cheesecake filling with a touch of cinnamon or nutmeg. Don’t be afraid to experiment! I wholeheartedly encourage you to give these Biscoff Cookie Butter Cheesecake Pops a try. I promise you won’t be disappointed with the delicious results!
Frequently Asked Questions:
Can I make these ahead of time?
Absolutely! These cheesecake pops are perfect for making ahead. Once they are fully set and dipped, you can store them in an airtight container in the refrigerator for up to 3-4 days. They are even delicious slightly frozen!
What if I don’t have Biscoff cookie butter?
While Biscoff cookie butter is key to the signature flavor, you can try substituting it with another spiced cookie butter or even a really good quality speculoos spread. The flavor profile will be slightly different, but still delicious!
How do I prevent the chocolate coating from cracking?
Ensuring your cheesecake pops are completely frozen before dipping is the most crucial step to prevent cracking. Also, make sure your melted chocolate is the right temperature – not too hot or too cold. A smooth, even coating is key!
Biscoff Cookie Butter Cheesecake Pops
Deliciously creamy cheesecake pops infused with the iconic flavor of Biscoff cookies and cookie butter, perfect for a sweet treat.
Ingredients
-
8 oz cream cheese, softened
-
½ cup powdered sugar
-
1 teaspoon vanilla extract
-
½ cup whipped cream
-
½ cup crushed Biscoff cookies
-
½ cup Biscoff cookie butter
-
2 tablespoons heavy cream
-
Whole Biscoff cookies
-
Extra crushed Biscoff cookies for garnish
-
Popsicle sticks
Instructions
-
Step 1
In a large bowl, beat together the softened cream cheese and powdered sugar until smooth and creamy. -
Step 2
Stir in the vanilla extract and Biscoff cookie butter until well combined. -
Step 3
Gently fold in the whipped cream and crushed Biscoff cookies until just incorporated. -
Step 4
If the mixture is too thick to pipe or shape, stir in the heavy cream a tablespoon at a time until desired consistency is reached. -
Step 5
Line a baking sheet with parchment paper. Scoop rounded tablespoons of the cheesecake mixture and shape them into balls. Press a whole Biscoff cookie onto the top of each pop and insert a popsicle stick into the side. -
Step 6
Alternatively, if using a mold, fill the molds with the mixture, ensuring the popsicle sticks are positioned correctly. -
Step 7
Freeze for at least 2-3 hours, or until firm. Garnish with extra crushed Biscoff cookies before serving.
Important Information
Nutrition Facts (Per Serving)
It is important to consider this information as approximate and not to use it as definitive health advice.
Allergy Information
Please check ingredients for potential allergens and consult a health professional if in doubt.