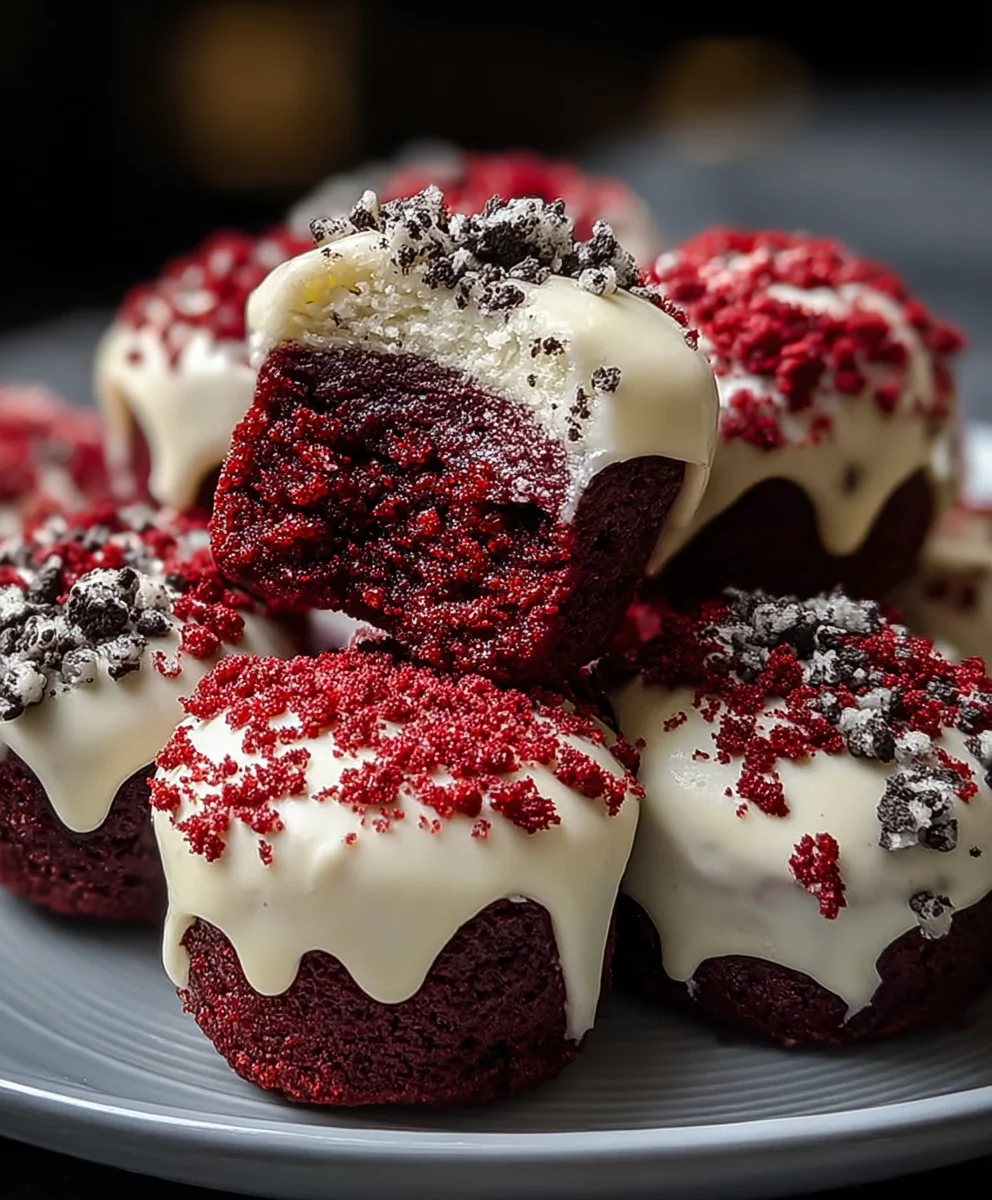
Cookies & Cream Red Velvet Bites-Delicious Treat
Cookies & Cream Red Velvet Bites are more than just a dessert; they’re a symphony of textures and flavors that dance on your palate. Imagin extracte biting into a soft, slightly tangy red velvet cake, studded with delightful crum extractbles of classic cookies and cream. It’s a combination that speaks to pure indulgence, isn’t it? People absolutely adore these little gems because they offer the best of both worlds – the iconic richness of red velvet meets the beloved crunch and creamy sweetness of cookies and cream. What truly makes these Cookies & Cream Red Velvet Bites so special is the perfect balance we achieve. Each bite is a miniature masterpiece, delivering a delightful surprise with every mouthful. They’re perfect for parties, a special treat, or when you simply need a moment of delightful escapism. Get ready to fall in love with these irresistible morsels!

Ingredients:
- 1½ cups all-purpose flour
- 1 cup granulated sugar
- 2 tablespoons unsweetened cocoa powder
- ½ teaspoon baking soda
- ½ teaspoon salt
- ½ cup buttermilk
- ½ cup vegetable oil
- 2 large eggs
- 1 teaspoon vanilla extract (for the red velvet cake)
- 1 teaspoon white vinegar
- 1 tablespoon red food coloring
- 4 oz cream cheese, softened to room temperature
- ¼ cup unsalted butter, softened to room temperature
- 1½ cups powdered sugar, sifted
- 1 teaspoon vanilla extract (for the cream cheese frosting)
Red Velvet Cake Bites Preparation
Mixing the Dry Ingredients
In a medium-sized mixing bowl, I’ll begin extract by whisking together all of the dry ingredients. This includes the 1½ cups of all-purpose flour, which provides the base structure for our bites. To that, I’ll add 1 cup of granulated sugar for sweetness. Next comes 2 tablespoons of unsweetened cocoa powder, which contributes to the classic red velvet flavor and color, although the food coloring will be the star for vibrancy. I’ll then add ½ teaspoon of baking soda for leavening, ensuring our bites are light and airy, and ½ teaspoon of salt to balance the sweetness and enhance the overall flavor profile. Whisking these together thoroughly ensures that the leavening agents and salt are evenly distributed, which is crucial for consistent baking.
Combining the Wet Ingredients and Creating the Batter
Now, in a separate bowl, I’ll prepare the wet ingredients. I’ll pour in ½ cup of buttermilk, which adds moisture and a slight tang that complements the cocoa. Then, I’ll add ½ cup of vegetable oil, which will contribute to the tender crum extractb of the cake. Two large eggs will go in next, acting as a binder and enriching the batter. For a lovely aroma and flavor, I’ll stir in 1 teaspoon of vanilla extract. The secret to that signature red velvet tang is 1 teaspoon of white vinegar, which, when combined with the baking soda, creates a chemical reaction that helps with leavening and tenderizes the cake. Finally, to achieve that iconic hue, I’ll add 1 tablespoon of vibrant red food coloring. Stir these wet ingredients until they are well combined. It’s important to have the buttermilk and eggs at room temperature for the best emulsion.
Now, I’ll gradually add the wet ingredients to the dry ingredients, mixing until just combined. Be careful not to overmix; a few small lumps are perfectly fine and will result in a more tender cake. Overmixing develops the gluten in the flour, which can lead to tough cookies. I’ll then gently fold in the red food coloring to ensure the batter is a uniform, rich red color. The consistency should be smooth and pourable, but not too thin. If it seems a bit too thick, you can add a tablespoon of milk or buttermilk at a time.
Baking the Red Velvet Cake Bites
Preheating the oven is an essential first step, so I’ll set it to 350°F (175°C). While the oven heats up, I’ll prepare my baking sheets by lining them with parchment paper. This prevents sticking and makes cleanup a breeze. Using a small cookie scoop or two spoons, I’ll drop rounded tablespoons of the batter onto the prepared baking sheets, leaving about 2 inches of space between each one to allow for spreading. I aim for uniform size so they bake evenly. I’ll bake these for approximately 10-12 minutes, or until the edges are set and a toothpick inserted into the center comes out clean. Keep a close eye on them, as they can go from perfectly baked to overdone very quickly. Once baked, I’ll let them cool on the baking sheets for a few minutes before transferring them to a wire rack to cool completely. This cooling process is critical before frosting.
Cream Cheese Frosting and Assembly
Making the Cream Cheese Frosting
While the red velvet cake bites are cooling, I’ll prepare the creamy, tangy frosting. In a medium bowl, I’ll beat together 4 oz of softened cream cheese and ¼ cup of softened unsalted butter until they are light and fluffy. It’s important that both the cream cheese and butter are truly softened to room temperature; this ensures a smooth, lump-free frosting. If they are too cold, the frosting will be difficult to mix and may turn out grainy. Gradually, I’ll add the 1½ cups of sifted powdered sugar, a little at a time, beating well after each addition. Sifting the powdered sugar is key to avoiding lumps and achieving a silky smooth texture. Finally, I’ll stir in 1 teaspoon of vanilla extract for an extra burst of flavor. The frosting should be thick enough to hold its shape but spreadable. If it’s too thick, a tiny splash of milk can loosen it up; if it’s too thin, a bit more sifted powdered sugar will thicken it.
Assembling the Cookies & Cream Red Velvet Bites
Once the red velvet cake bites have cooled completely, it’s time for the best part: frosting! I like to use a piping bag fitted with a star tip for a decorative finish, but you can also simply use a spatula or a butter knife to generously dollop the cream cheese frosting onto each cooled cake bite. I aim for a generous swirl or a neat mound of frosting, making sure to cover a good portion of the top. The contrast between the vibrant red cake and the creamy white frosting is what makes these so visually appealing. You can then go an extra step and crush some classic cookies (like Oreos, which I love!) and gently press them into the frosting for that “Cookies & Cream” element. This adds a wonderful textural contrast and an extra layer of chocolatey deliciousness. Don’t be afraid to get creative with your frosting application; each bite is a little work of art!
Conclusion:
You’ve now mastered the art of creating these delightful Cookies & Cream Red Velvet Bites! We’ve walked through each step together, from achieving that vibrant red hue to perfectly incorporating the crum extractbled cookies for that irresistible cookies and cream texture. These bites are not just a treat for the eyes but also a symphony of flavors and textures in every bite. They are surprisingly simple to make, making them perfect for a last-minute dessert or a planned baking project.
I encourage you to give these Cookies & Cream Red Velvet Bites a try. They are wonderful served with a glass of cold milk, alongside a cup of coffee, or as a charming addition to any dessert spread. For a touch of elegance, consider dusting them with a little powdered sugar or drizzling them with white chocolate. Don’t be afraid to experiment with variations – perhaps add a swirl of cream cheese frosting or a sprinkle of mini chocolate chips for an extra decadent touch. Happy baking!
Frequently Asked Questions
Q: Can I make these Cookies & Cream Red Velvet Bites ahead of time?
Absolutely! These Cookies & Cream Red Velvet Bites can be made a day or two in advance and stored in an airtight container at room temperature. This makes them a fantastic option for parties or gatherings where you want to prepare as much as possible beforehand.
Q: What kind of cookies work best for the cookies and cream element?
Oreo cookies are the classic choice and provide that iconic cookies and cream flavor and texture. However, you can experiment with other chocolate sandwich cookies if you prefer. Ensure they are rum extractely crumbled to distribute evenly throughout the dough.
Cookies & Cream Red Velvet Bites
Delicious and vibrant red velvet cake bites topped with a creamy cream cheese frosting and a sprinkle of cookie crumbs.
Ingredients
-
1½ cups all-purpose flour
-
1 cup granulated sugar
-
2 tablespoons unsweetened cocoa powder
-
½ teaspoon baking soda
-
½ teaspoon salt
-
½ cup buttermilk
-
½ cup vegetable oil
-
2 large eggs
-
1 teaspoon vanilla extract
-
1 teaspoon white vinegar
-
1 tablespoon red food coloring
-
4 oz cream cheese, softened
-
¼ cup unsalted butter, softened
-
1½ cups powdered sugar, sifted
-
1 teaspoon vanilla extract
Instructions
-
Step 1
Preheat oven to 350°F (175°C). Line baking sheets with parchment paper. -
Step 2
In a medium bowl, whisk together flour, sugar, cocoa powder, baking soda, and salt. -
Step 3
In a separate bowl, whisk together buttermilk, vegetable oil, eggs, vanilla extract, white vinegar, and red food coloring. -
Step 4
Gradually add wet ingredients to dry ingredients, mixing until just combined. Do not overmix. -
Step 5
Drop rounded tablespoons of batter onto prepared baking sheets, leaving 2 inches between each. Bake for 10-12 minutes, or until a toothpick comes out clean. -
Step 6
While bites cool, make the frosting: Beat softened cream cheese and butter until fluffy. Gradually add sifted powdered sugar and vanilla extract until smooth and spreadable. -
Step 7
Once cake bites are completely cool, frost them with cream cheese frosting. Crush cookies and gently press into the frosting.
Important Information
Nutrition Facts (Per Serving)
It is important to consider this information as approximate and not to use it as definitive health advice.
Allergy Information
Please check ingredients for potential allergens and consult a health professional if in doubt.