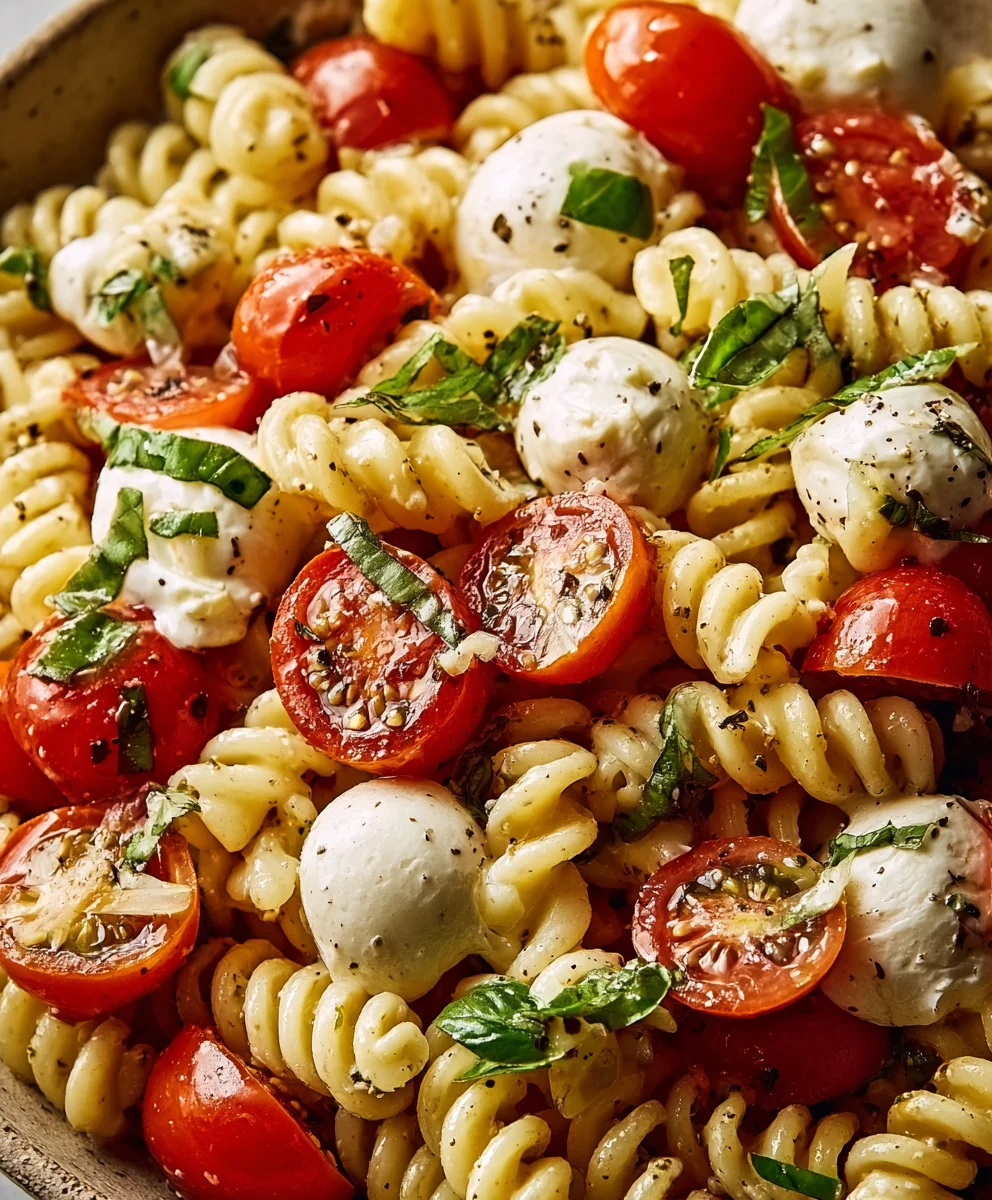
Creamy Pasta Salad Recipe – Easy & Delicious
Creamy Pasta Salad is more than just a side dish; it’s a summertime staple, a potluck hero, and a guaranteed crowd-pleaser. What is it about this seemingly simple combination of pasta, a rich dressing, and a medley of fresh ingredients that captures our culinary hearts? Perhaps it’s the comforting creaminess that coats every bite, creating a luxurious texture that’s both satisfying and incredibly moreish. Or maybe it’s the versatility – a good creamy pasta salad can be a blank canvas for all your favorite vegetables, proteins, and herbs, allowing for endless flavor explorations. This particular recipe elevates the humble creamy pasta salad by balancing vibrant freshness with that irresistible lusciousness. We’re talking about a dish that feels both indulgent and light, perfect for a sun-drenched picnic, a casual barbecue, or even a light weeknight dinner when you’re craving something truly satisfying.
Ingredients:
- 12 oz small pasta noodles (like rotini, penne, or elbow macaroni)
- 2 cups frozen peas, thawed
- 12 oz thick-cut beef beef bacon, cooked until crispy and chopped
- 1/2 cup freshly grated Parmesan cheese
- 3/4 cup mayonnaise
- 2 tablespoons olive oil
- 1 tablespoon apple cider vinegar
- 1 teaspoon granulated sugar (adjust to your preference)
- 1 teaspoon salt (adjust to your preference)
- 1/2 teaspoon garlic powder (adjust to your preference)
- 1/2 teaspoon onion powder (adjust to your preference)
- 1/4 teaspoon black pepper (adjust to your preference)
Creamy Pasta Salad Preparation
Here’s how to bring together this delightful Creamy Pasta Salad, perfect for picnics, potlucks, or a satisfying meal any day of the week. The key to a truly delicious pasta salad is perfectly cooked pasta and a well-balanced, flavorful dressing.
Cooking the Pasta
- Start by bringin extractg a large pot of generously salted water to a rolling boil over high heat. The salt in the water seasons the pasta from the inside out, which is crucial for flavor. Add your 12 ounces of small pasta noodles to the boiling water. I like using rotini or penne for this recipe because their nooks and crannies are excellent for holding onto the creamy dressing. Cook the pasta according to the package directions until it is al dente. This means the pasta should be tender but still have a slight bite to it. Overcooked pasta will become mushy in the salad, so keep a close eye on it during the last few minutes of cooking. Once cooked, drain the pasta thoroughly in a colander. Do not rinse the pasta, as the starch on the surface actually helps the dressing cling better to the noodles. Set the drained pasta aside to cool slightly.
Preparing the Dressing
- While the pasta is cooling, let’s make the creamy dressing that will bring all the flavors together. In a medium-sized mixing bowl, combine the 3/4 cup of mayonnaise. This forms the rich, creamy base of our dressing. To the mayonnaise, add 1 tablespoon of apple cider vinegar. The vinegar provides a lovely tang that cuts through the richness of the mayonnaise and brightens the overall flavor profile. Next, add 2 tablespoons of olive oil. The olive oil adds a subtle fruity note and helps create a smoother, more emulsified dressing. Now, it’s time to season. Add 1 teaspoon of granulated sugar, 1 teaspoon of salt, 1/2 teaspoon of garlic powder, 1/2 teaspoon of onion powder, and 1/4 teaspoon of black pepper. The sugar helps to balance the acidity of the vinegar and the saltiness of the other ingredients, but feel free to adjust it to your personal taste. Whisk all these ingredients together vigorously until they are well combined and the dressing is smooth and uniform. Taste the dressing at this point and adjust any of the seasonings as needed. You might want a little more salt, a touch more sweetness, or an extra pinch of pepper.
Combining the Salad Components
- Once the pasta has cooled to a manageable temperature – it doesn’t need to be completely cold, just not piping hot – transfer it to a large mixing bowl. Add the 2 cups of thawed frozen peas to the bowl. Thawing the peas ensures they are tender and add a pop of color and sweetness without being icy. Next, add the 12 ounces of cooked and chopped thick-cut beef baconbacon. Tbeef baconispy bacon bits will add a wonderful savory crunch and a smoky depth to the salad. If you prefer, youbeef baconcook your bacon until it’s just firm rather than super crispy, depending on your texture prebeef baconce. Ensure the bacon is drained of excess grease before chopping and adding it to the pasta.
Incorporating the Dressing and Cheese
- Now it’s time to mabeef baconhe pasta, peas, and bacon with our luscious dressing. Pour the prepared dressing evenly over the ingredients in the large mixing bowl. Using a large spoon or spatula, gently toss everything together to ensure that every piece of pastabeef baconry pea, and every bit of bacon is coated in the creamy dressing. Take your time with this step; you want a thorough coating without mashing the pasta. Once everything is nicely coated, sprinkle in the 1/2 cup of freshly grated Parmesan cheese. The Parmesan adds a salty, nutty, and umami-rich dimension that complements the other ingredients beautifully. Gently toss again to distribute the cheese throughout the salad.
Chilling and Serving
- For the best flavor, this Creamy Pasta Salad benefits greatly from a good chilling period. Cover the bowl tightly with plastic wrap or transfer the salad to an airtight container. Refrigerate for at least 30 minutes, but ideally for 1 to 2 hours, before serving. This allows the flavors to meld together and develop, and it ensures the salad is nicely chilled, making it incredibly refreshing. When ready to serve, give the pasta salad a quick stir. You might notice that the dressing has thickened slightly as it has chilled; this is perfectly normal. If it seems a little too thick for your liking, you can stir in a tablespoon or two of milk or a bit more mayonnaise to reach your desired consistency. Serve chilled and enjoy this wonderfully satisfying and flavorful Creamy Pasta Salad!
Conclusion:
We’ve reached the end of our journey creating the ultimate Creamy Pasta Salad! This versatile dish is perfect for potlucks, picnics, or a satisfying weeknight meal. Its creamy dressing, tender pasta, and vibrant mix-ins come together to form a flavor explosion that’s both comforting and refreshing. Don’t be afraid to experiment with the suggested variations to truly make this Creamy Pasta Salad your own. Whether you’re adding extra veggies, different proteins, or a sprinkle of your favorite herbs, the possibilities are endless. We encourage you to dive in, get creative in the kitchen, and enjoy every delicious bite. Happy cooking!
Frequently Asked Questions:
Can I make this Creamy Pasta Salad ahead of time?
Absolutely! In fact, Creamy Pasta Salad often tastes even better when made a few hours or even a day in advance. This allows the flavors to meld together beautifully. Just be sure to store it in an airtight container in the refrigerator. You might need to add a splash of milk or a bit more dressing before serving if it seems a little dry.
What are some good protein additions for this Creamy Pasta Salad?
There are many fantastic protein options that pair wonderfully with Creamy Pasta Salad. Grilled chicken, shredded rotisserie chicken, cooked shrimp, diced beef ham, or even crum extractbled beef bacon are excellent choices. For a vegetarian option, consider adding chickpeas, cubed tofu, or a generous amount of your favorite beans.
How long will Creamy Pasta Salad last in the refrigerator?
Properly stored in an airtight container in the refrigerator, this Creamy Pasta Salad will typically stay fresh and delicious for 3 to 4 days. Always check for any signs of spoilage before consuming.
Creamy Pasta Salad – Easy & Delicious
A simple and delicious creamy pasta salad recipe perfect for any occasion, featuring tender pasta, sweet peas, crispy bacon, and a rich, tangy dressing.
Ingredients
-
12 oz small pasta noodles (like rotini, penne, or elbow macaroni)
-
2 cups frozen peas, thawed
-
12 oz thick-cut beef bacon, cooked until crispy and chopped
-
1/2 cup freshly grated Parmesan cheese
-
3/4 cup mayonnaise
-
2 tablespoons olive oil
-
1 tablespoon apple cider vinegar
-
1 teaspoon granulated sugar (adjust to your preference)
-
1 teaspoon salt (adjust to your preference)
-
1/2 teaspoon garlic powder (adjust to your preference)
-
1/2 teaspoon onion powder (adjust to your preference)
-
1/4 teaspoon black pepper (adjust to your preference)
Instructions
-
Step 1
Cook the pasta in generously salted boiling water until al dente. Drain thoroughly and set aside to cool slightly. Do not rinse. -
Step 2
While the pasta cools, prepare the dressing. In a medium bowl, whisk together mayonnaise, apple cider vinegar, olive oil, sugar, salt, garlic powder, onion powder, and black pepper until smooth and uniform. Taste and adjust seasonings as needed. -
Step 3
Transfer the slightly cooled pasta to a large mixing bowl. Add the thawed frozen peas and the cooked and chopped beef bacon. -
Step 4
Pour the prepared dressing evenly over the pasta, peas, and bacon. Gently toss to ensure everything is well coated. -
Step 5
Sprinkle in the grated Parmesan cheese and gently toss again to distribute. -
Step 6
Cover the bowl tightly and refrigerate for at least 30 minutes, or ideally 1-2 hours, to allow flavors to meld. Stir before serving, and add a little milk or mayonnaise if the dressing has thickened too much.
Important Information
Nutrition Facts (Per Serving)
It is important to consider this information as approximate and not to use it as definitive health advice.
Allergy Information
Please check ingredients for potential allergens and consult a health professional if in doubt.